new site, who dis?

Hi, friends! I haven’t been posting here lately, mostly because my fiance and I are busy working on our biggest DIY project yet, Rosy the Argosy! Rosy is a vintage Airstream camper that we are renovating, and we’ll eventually move into her full time to live a more minimalist, purposeful lifestyle. I am keeping jamie’s home blog active so I can come back and post here when I do projects, but my new internet home is www.teamjamavick.com. At #teamjamavick, Arnavick and I will be sharing DIYs, renovation posts, crafts, tiny living and travel stories, and more. Hope to see you there, and thanks for visiting my little corner of the internet!

xo,

Jamie + Arnavick

teamjamavick


Mid Century Craigslist Dresser Makeover

Let me begin this post by addressing the furniture purists.  Hello, you.  You’re smart, and you have valid opinions, and I love that you’re passionate about maintaining the original beauty of pieces.  Because someone put their blood, sweat, and tears into designing them in all their glory.  So you shouldn’t mess with that.  I get it.  I feel you.  I mostly agree with you.  But this dresser… THIS. DRESSER. was too far gone, and it was paint, or get off the pot trash it.  I promise I didn’t mess up a good thing.  I made a mediocre thing great.  There were, however, some bumps in the road on this journey.  Come along with me and see…  Sorry in advance for some of the more blurry pics.

Uhhh, how long ago did I buy this dresser?  Oh right… like three years ago.  I found it via craigslist.  Three years, and I’m just getting around to giving it a makeover.  Sorry, dresser.

Mid Century Modern Dresser

This MCM dresser has a beautiful masculine shape, and great bones.  Dovetailing, wooden drawer glides, sturdy build, tapered feet, gorgeous hardware, simple decorative fluting.  Overall a great piece…

mcm-dresser-before-ick

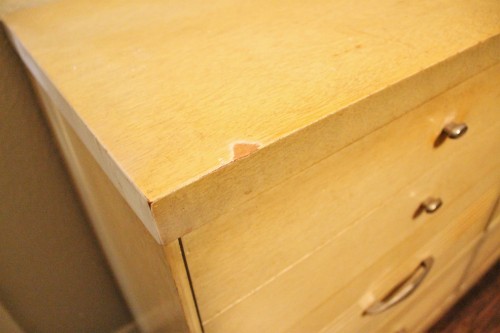
The veneer surrounding the piece was a MESS.  Scraped, chipped, scratched.
mcm-dresser-chipped

At some point, a previous owner sought to paint it, I guess, because there was a big white unfinished spot on one edge…  And the color… The color was atrocious.  If I’m spitball guessing, I’d say that someone, at some point, polyurethane’d the heck out of it, which left it with a stale, burnt, pale yellow hue.

mcm-dresser-drawer-close

The outer surfaces were beyond repair, so I decided to paint them.  Guys, I made my own chalk paint, and I messed up…

I used a diy chalk paint formula that calls for plaster of Paris, and when I picked out a perfect, very dark navy blue, I didn’t account for the fact that the powdery white plaster of paris would *significantly* lighten the color. I tried to convince myself that it wasn’t awful for weeks, but really, I hated it.

mcm-dresser-blue-swatchmcm-dresser-blue-topmcm-dresser-mismatchimg_0625

So when I was ready to pick the project back up, I went with a crispy bright white.  A – I thought it would look amazing and B – there was no worry of the plaster of Paris changing the color.  I used this formula for the chalk paint, and used a sample size of Valspar Polar White for the color.

I was wayyy happier with the white.  And really, despite hating the first color I picked, I loved using the diy chalk paint.  It takes some getting used to (the texture is different, even when compared to professionally mixed chalk paint).  It was almost like painting icing on a cake.  A lot of icing on a very large cake.  I recommend making your coats as thin as possible with chalk paint.  It’s super thick and has amazing coverage.  I covered the crazy blue with just THREE COATS of white.  No priming, no sanding, straight up paint on a brush, applied to the dresser.  Three coats, plus one coat of paste wax on top to protect the finish.  How’s that for a slice of fried gold?

img_2526img_2532

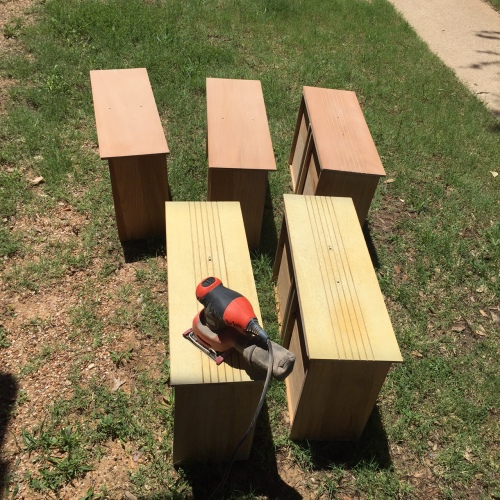
For the drawer fronts, I used Minwax Polyshades in Mission Oak, in a satin finish.  A flat finish may have been a better choice considering the chalky flat finish you get with chalk paint, but the difference in finishes isn’t noticeable to me.  I did sand these before applying the stain to remove the existing layers of poly and general yuck.  The wood veneer on the drawers was in good condition, and it was thick, so it held up to a moderate session with my power sander.
img_2298mcm-dresser-drawer-sandmcm-dresser-drawer-sand-complete

The big plus of the polyshades product (no, this post isn’t sponsored) is that you have your stain and poly all in one step.  Efficient and easy.  Two coats, and I was good to go.

mcm-dresser-drawer-stained-two

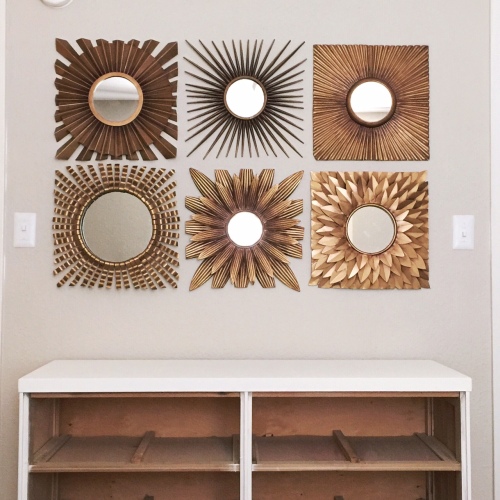
The end result?  A super handsome, two-toned, MCM dresser, upgraded from ick.  I am ecstatic with the outcome of this long-awaited (if only by me) project!  Side note – I also switched out my green window-pane mirror (which was too small for the wall) for a six piece gold sunburst set… have mercy.  What a big difference!

img_2533img_2534

So what do you think?  Love it?  Hate it?  Opinions on diy chalk paint?  Do tell…

DIY Hanging Bud Vase

Oh hi, blog land! It’s been, uhhh, six-ish months since I’ve posted anything here… Which, well, sucks. I’m still here, you guys, and I still want to do this diy blog life thing. It’s hard lately. By way of explanation, a second job kind of fell into my lap last December, and I jumped at the chance to take it. It’s a lot of work, dudes. Like, a LOT. I’m not complaining, though, because it’s fun work. And, well, I like money. I’ve got lotsa diy dreams, and money will certainly help me accomplish them. It’s just been a busy whirlwind that hasn’t left me a cache of energy to work on projects (or finish the five or so that I’ve got in progress/half done). In any case, I want to pledge to balance business and pleasure better, so hopefully I’ll be around on here more often. I’ve got something to share today, though, so let’s get started!

I’ve got a history of making garden related things for my flower child mom and posting them here (painted flower potsplant markers). This post continues that tradition.

My mom has these rose bushes… She loves them dearly. She planted them at the house where we lived while I was in junior high and high school. When she and my father downsized after my sister and I moved out, my dad carefully dug them up so she could transplant them to their new yard. Five or so years later, they’re still doing pretty well, despite one getting a rose disease. Yes, rose diseases are a real thing.

She’s always snipping off a rose or two and giving them to me and my sister, or displaying them in jars around the house. So for Mother’s Day, I made my Mom a wall mounted bud vase!

I can’t take full cred for the idea. Buzzfeed’s Nifty Facebook page posted a video of three mason jars being mounted to a board to display succulents, organize your bathroom, etc. I just took the idea and modified it. It was easy peasy, lemon squeezy!

Supplies

  • Block of wood (mine was a scrap)
  • Jar
  • Twine
  • Acrylic paint
  • Hose clamp
  • Screw
  • Sawtooth hanger

Tools

  • Phillips head screwdriver
  • Flat head screwdriver
  • Foam paintbrush
  • Hot glue gun + 1 hot glue stick
  • Hammer

Steps:

1. Paint your wood block. The first coat is pictured here, but I ended up painting three coats on the front and two on the edges.

2. Prep your jar. I used a salsa jar, which still had salsa in it, and since I don’t waste salsa EVER, I poured it into a plastic food saver and proceeded to wash the jar.

Pro tips:

  • Wash the jar thoroughly with hot water and dish soap.
  • Use goo-gone to help you get the label off. The kind in the spray nozzle bottle is amazing.
  • To remove printed-on “best if used by” dates, soak a cotton ball in a little bit of rubbing alcohol or nail polish remover and gently wipe off the ink.

3. Add twine or ribbon to the rim. The threading on the top rim of the jar makes it very obvious that it’s a salsa jar. Using hot glue to affix twine around the rim gives it a much more finished look.

I don’t have pics of the below parts of the process, but Buzzfeed’s video is a good resource for visuals for the parts I’m about to explain.

4. Attach your sawtooth hanger to the back of your board. Because I did a vertical bud vase I attached it to the very top in the middle, using the tiny nails that come with the hanger, and a hammer. If you’re making a horizontal hanger, you’ll probably want to use two sawtooth hangers towards each top corner of the board. Because I sometimes get asked what a sawtooth hanger is, look here:

5. Attach the hose clamp to your board. You’ll want to measure to find the middle of your board and then mark where you’re going to screw the hose clamp in. Make a very small pilot hole for your screw. Open the hose clamp and use a Phillips head screw to attach the clamp to the board.

6. Insert the jar in the hose clamp, and use a flathead screwdriver to tighten the hose clamp down taut so that the jar has no wiggle room. Not too tight, though, you don’t want to break your vase!

7. Hang, add water and pretty flowers, enjoy!

And because I love the waterlogue app and how pretty it makes flowers look, here’s a waterlogue pic of the vase:

This was so easy and inexpensive to make! I want to make a ton more so I can display all of the flowers! 🌻💐🌺🌸🌼🌷🌹

A Very Cube-y Christmas

Hello internets! It feels like it’s been ages since I’ve posted – because it kinda has been.  Let me first assure anyone who’s following along (thanks!) that I’m not going anywhere!  In my real life, I work in the online retail industry, and fourth quarter is absolute madness for me.  I just don’t have the time for a good ol’ hands on DIY project this time of year.  ‘Tis the season for online shopping, #amirite?!

Moving on… I have some projects on the to-do list that I’m very excited about tackling and later posting here.  In the interim, I thought I’d do a quickie post about how my cubicle at work is decorated for Christmas!

Some people don’t care to decorate their cubicle at all, but my stance is that if I am going to spend most of my waking hours in here, I want to enjoy what I’m looking at!  It normally looks like this… 

photo-21
Here’s how I added a little holiday happiness to it!

4″ pre lit tree  

cubicle decirated for christmas  

Bow tree topper made of streamers ($1 at Target)

 cubicle decorated for christmas 

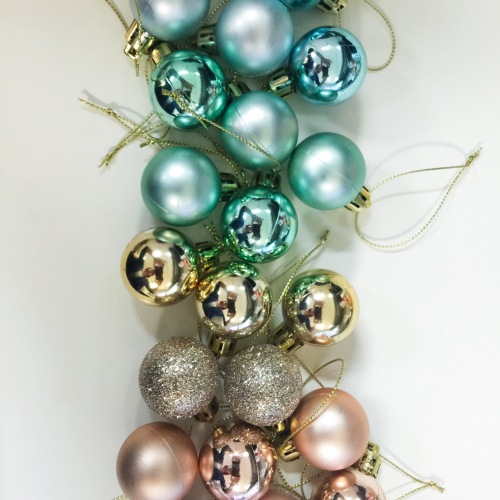
Pastel orb ornaments hung in a gradient pattern ($3 for 25 at Target)


Battery operated lights (I think these were $3 at the Target dollar spot, I’ve had them a few years now) + a Noble Fir branch (free! my mom cut it from her tree for me) for my console

 cubicle decorated for christmas

Merry message on my mini chalkboard

 cubicle decorated for christmas 

This only took me about 30 min total to put together, and added up to a whole $4 when you consider that I already had much of this stuff lying around!

 cubicle decorated for christmas 

Now my cubicle has me feeling the holiday spirit every time I walk into it!

Anyone else out there decorating their workspaces?  Link to yours in the comments if you please! 

Happy Holidays homies! 

xo

Spray Painting Tips and Tricks

Hi friends.  I have joked before that I’ll spray paint anything that holds still long enough.  While that’s a bit of an exaggeration, a big chunk of my projects and my posts here on jhb involve spray painting, so I figured I’d share my best tricks and tips with you guys!

*This one is obvious, but, always read and follow the manufacturer’s instructions on the can!  Not all spray paints are created equal, and they can behave differently depending on the brand, finish, and even the climate you’re in.
*Make sure your object is spray-paintable! The instructions on your spray paint can will tell you what surfaces it’s designed for.
*Shake, shake, shake!  Make sure you shake the can until the ball rattles and then for another two minutes to make sure that everything in the can is thoroughly mixed together.  My arm gets tired when I do this but skimping here can mean a gloppy, uneven mess.  Ick.
*Protect yourself!  I always wear gloves (can’t be messin’ up my mani), clothes I don’t care about, and a dust mask.  I don’t want to breathe in paint particles, and neither should you.  It’s plain bad for you.
*Prep your surface!  Plastic drop cloths are very cost effective, and can usually be re-used many times if you take proper care of them.  I always lay a drop cloth on my work surface, and if there’s a light breeze going (a luxury here in North Texas), I protect items around me from overspray with an additional drop cloth.
*Take it easy!  Use a light trigger finger on that spraypaint can to avoid a gloppy, drippy mess, friend. It should take at least three light coats to get full coverage with spraypaint.
*Move swiftly!  Quick, even strokes (paired with the light trigger finger) make for beautiful coverage and a smooth finish!
*Paint at your own risk…  Guys, I’m an amateur home diy-er.  I have a lot of experience, but I am not licensed, and I am not a professional.  Everything I write on this blog is an account of, or based upon an experience of my own.  If you don’t feel comfortable using spray paint, tools or anything else, consult a pro first, okay?

I hope these tips are helpful to all of you in diyland!  Here are some of my spray paint projects:

Post links: green mirror | gold mirror | instagram t-shirt | gold metal and glass console | pattern top accent table | coral frames

Do you have any tips, tricks or warnings about spray painting?  Holler at me in the comments!