Tag Archives: furniture facelift

Mid Century Craigslist Dresser Makeover

Let me begin this post by addressing the furniture purists.  Hello, you.  You’re smart, and you have valid opinions, and I love that you’re passionate about maintaining the original beauty of pieces.  Because someone put their blood, sweat, and tears into designing them in all their glory.  So you shouldn’t mess with that.  I get it.  I feel you.  I mostly agree with you.  But this dresser… THIS. DRESSER. was too far gone, and it was paint, or get off the pot trash it.  I promise I didn’t mess up a good thing.  I made a mediocre thing great.  There were, however, some bumps in the road on this journey.  Come along with me and see…  Sorry in advance for some of the more blurry pics.

Uhhh, how long ago did I buy this dresser?  Oh right… like three years ago.  I found it via craigslist.  Three years, and I’m just getting around to giving it a makeover.  Sorry, dresser.

Mid Century Modern Dresser

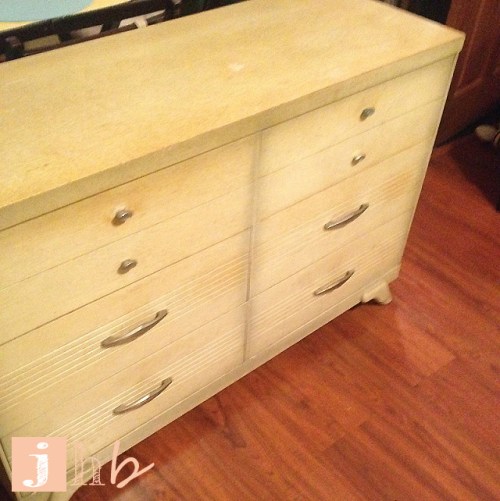
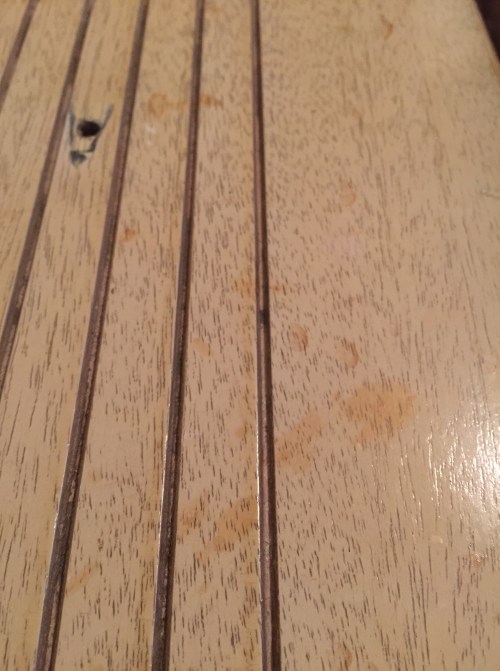
This MCM dresser has a beautiful masculine shape, and great bones.  Dovetailing, wooden drawer glides, sturdy build, tapered feet, gorgeous hardware, simple decorative fluting.  Overall a great piece…

mcm-dresser-before-ick

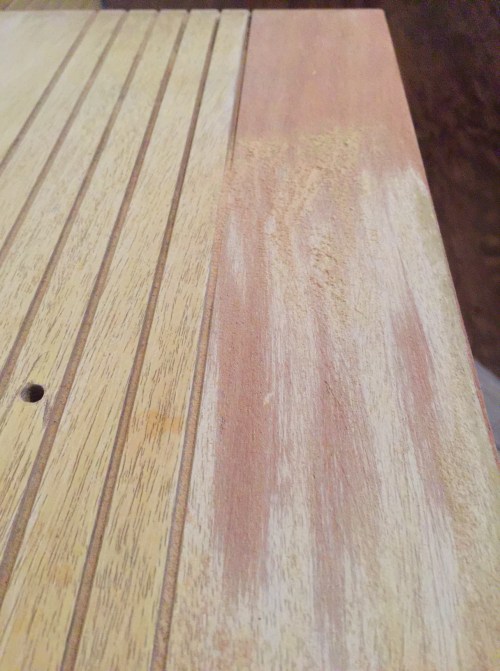
The veneer surrounding the piece was a MESS.  Scraped, chipped, scratched.

mcm-dresser-chipped

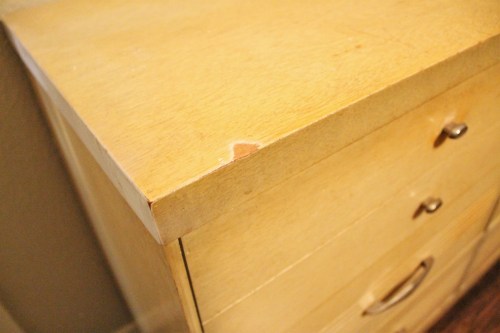
At some point, a previous owner sought to paint it, I guess, because there was a big white unfinished spot on one edge…  And the color… The color was atrocious.  If I’m spitball guessing, I’d say that someone, at some point, polyurethane’d the heck out of it, which left it with a stale, burnt, pale yellow hue.

mcm-dresser-drawer-close

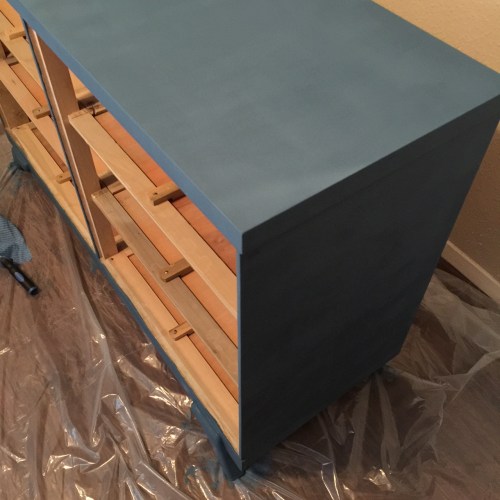
The outer surfaces were beyond repair, so I decided to paint them.  Guys, I made my own chalk paint, and I messed up…

I used a diy chalk paint formula that calls for plaster of Paris, and when I picked out a perfect, very dark navy blue, I didn’t account for the fact that the powdery white plaster of paris would *significantly* lighten the color. I tried to convince myself that it wasn’t awful for weeks, but really, I hated it.

mcm-dresser-blue-swatchmcm-dresser-blue-topmcm-dresser-mismatchimg_0625

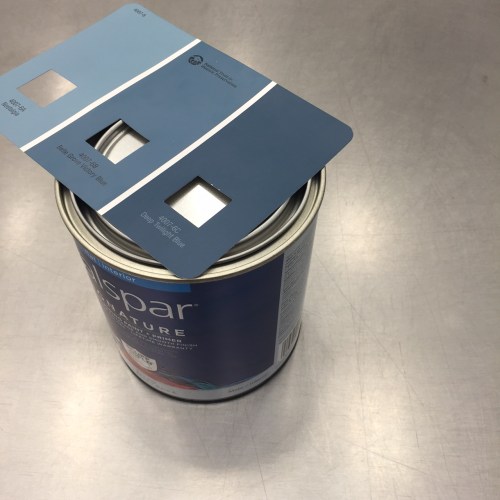
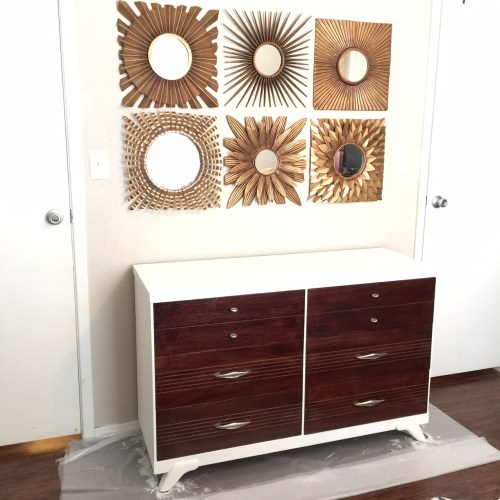
So when I was ready to pick the project back up, I went with a crispy bright white.  A – I thought it would look amazing and B – there was no worry of the plaster of Paris changing the color.  I used this formula for the chalk paint, and used a sample size of Valspar Polar White for the color.

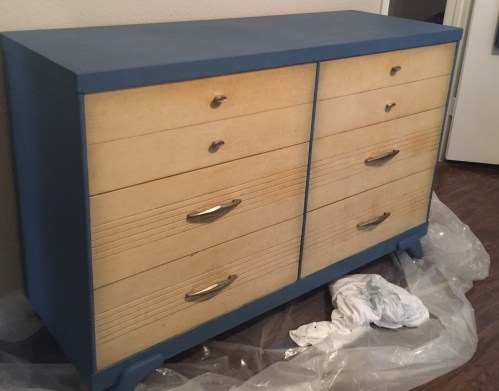
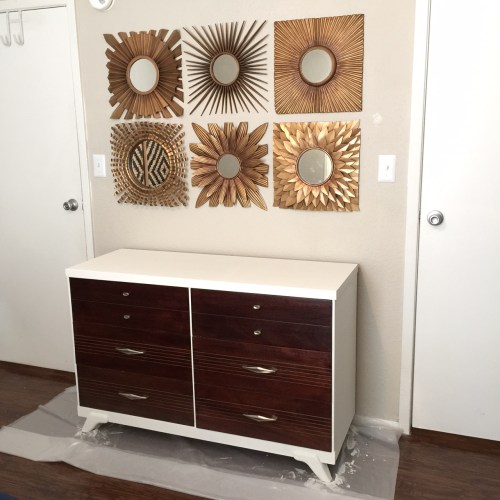
I was wayyy happier with the white.  And really, despite hating the first color I picked, I loved using the diy chalk paint.  It takes some getting used to (the texture is different, even when compared to professionally mixed chalk paint).  It was almost like painting icing on a cake.  A lot of icing on a very large cake.  I recommend making your coats as thin as possible with chalk paint.  It’s super thick and has amazing coverage.  I covered the crazy blue with just THREE COATS of white.  No priming, no sanding, straight up paint on a brush, applied to the dresser.  Three coats, plus one coat of paste wax on top to protect the finish.  How’s that for a slice of fried gold?

img_2526img_2532

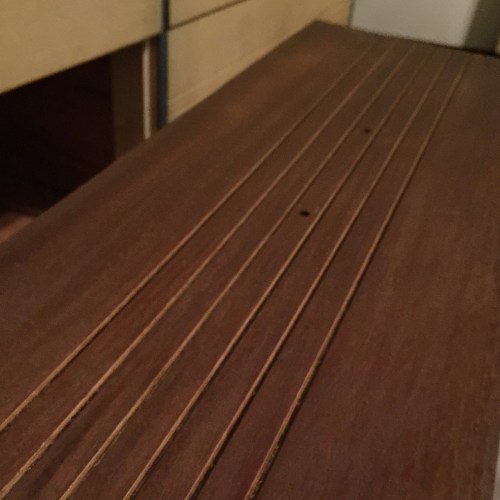
For the drawer fronts, I used Minwax Polyshades in Mission Oak, in a satin finish.  A flat finish may have been a better choice considering the chalky flat finish you get with chalk paint, but the difference in finishes isn’t noticeable to me.  I did sand these before applying the stain to remove the existing layers of poly and general yuck.  The wood veneer on the drawers was in good condition, and it was thick, so it held up to a moderate session with my power sander.

img_2298mcm-dresser-drawer-sandmcm-dresser-drawer-sand-complete

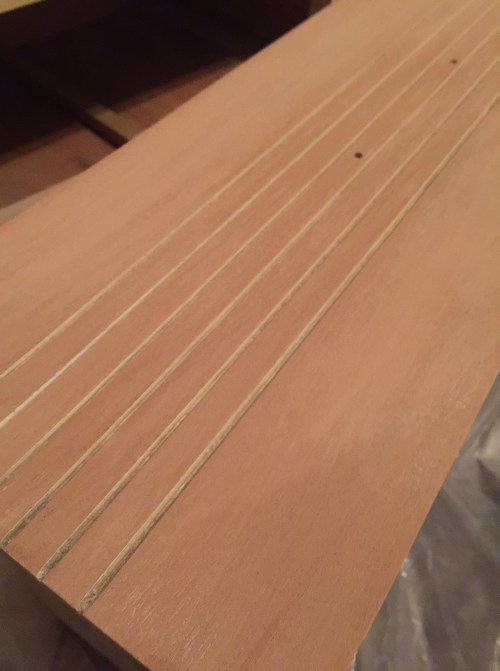
The big plus of the polyshades product (no, this post isn’t sponsored) is that you have your stain and poly all in one step.  Efficient and easy.  Two coats, and I was good to go.

mcm-dresser-drawer-stained-two

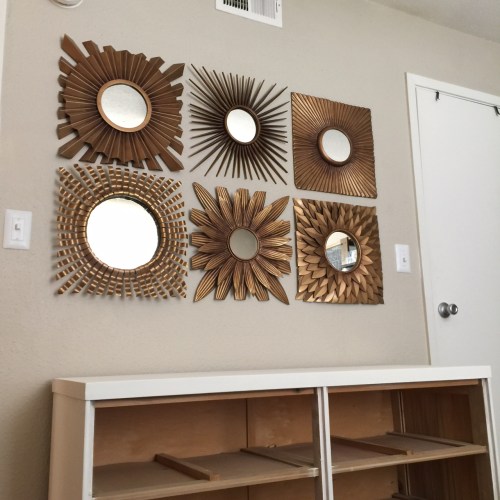
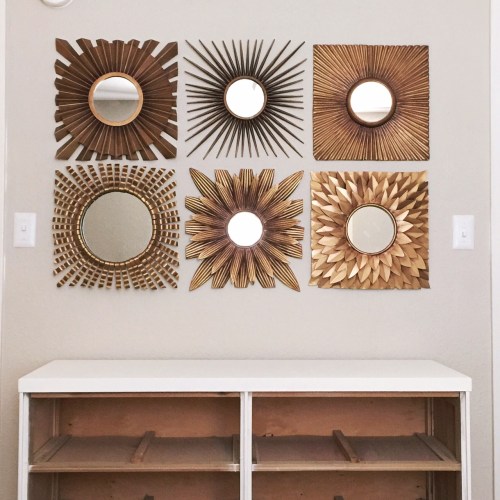
The end result?  A super handsome, two-toned, MCM dresser, upgraded from ick.  I am ecstatic with the outcome of this long-awaited (if only by me) project!  Side note – I also switched out my green window-pane mirror (which was too small for the wall) for a six piece gold sunburst set… have mercy.  What a big difference!

img_2533img_2534

So what do you think?  Love it?  Hate it?  Opinions on diy chalk paint?  Do tell…

Advertisement

Color Blocked Patio Table Tutorial

Even though I live in North Texas, I love being outside.  Ninety degree springs, 105 degree summers or 95 degree falls.  Doesn’t matter… I’m there.

My apartment’s patio is on the smaller side, but that doesn’t stop me from spending time on it, so I’m set on making the most of it!

Color Blocked Patio Table Tutorial

The last thing I posted about my patio was the colander that I turned into a planter.  This project is considerably more substantial.

I got this little wood table at my local Goodwill for $5.  That was four years ago.

Color Blocked Patio Table Tutorial

When I bought it, my plan was to give it a face-lift in the coming weeks but, you know, life happens.  For a while it served as a nightstand:

Before Adding New Nightstands

But then I made my own nightstands and I didn’t need it there anymore. So it sat in storage for about a year.

I finally got my tail in gear and color blocked it. It was actually pretty easy, just a bit time consuming. Here’s how I did it.

Color Blocked Patio Table Tutorial

Step 1 – remove existing finish.

I tried using citrustrip but there were too many heavy layers of black paint for it to do any good. It looked pretty gross.

Color Blocked Patio Table Tutorial Color Blocked Patio Table Tutorial Color Blocked Patio Table Tutorial

I ended up sanding the large surfaces with my power sander and the smaller surfaces, like the slats, by hand. With as thick as the paint was, the sanding actually went by very quickly. I went from 80 grit to 150 grit to 220 to get a nice smooth finish on the wood.

Color Blocked Patio Table Tutorial Color Blocked Patio Table Tutorial Color Blocked Patio Table Tutorial

Step 2 – clean.

This part was easy! I just hosed it down and let it sit in the hot afternoon sun for a couple of hours.

Color Blocked Patio Table Tutorial Color Blocked Patio Table Tutorial

Step 3 – beautification.

I wanted a two-tone table, and after some deliberation, the council at jhbhq determined that the underside would be a bright color and the outer surfaces would be stained.

Step 3a – stain.

I mixed Varathane American Walnut with Varathane Sunbleached and it came out a velvety, milky, muted walnut color. I love it!

Color Blocked Patio Table Tutorial

I always apply stain to wood wearing plastic gloves and most of the time I use an old cotton athletic sock that I can trash later to apply the stain to the wood. Clean of course. Please don’t use a dirty sock to apply wood stain. I’ll judge you.

I let the stain sit on the wood for a couple of minutes and then used a clean portion of the sock to wipe the excess stain off the table.

Step 3b – paint.

I ended up going with a vibrant pink to paint the underside of the table. This was a Valspar half-pint sample that I picked up on a trip to Lowe’s one day. The color is called Sonora Rose; Lowe’s featured it in their Color Studio 2013 Spring Palette.

Color Blocked Patio Table Tutorial

Before I could paint, though, I had to tape off all of the stained surfaces that I didn’t want to get paint on. I used frog tape but any painters tape will do.

Color Blocked Patio Table Tutorial

I primed with one coat of Zinsser Bullseye 1-2-3, and then applied two coats of the Sonora Rose.

Color Blocked Patio Table Tutorial

Color Blocked Patio Table Tutorial

Color Blocked Patio Table Tutorial

Step 4 – error correction.

Clearly I didn’t apply the tape as well as I should have. I had some bleed through with both the paint and the primer.

Color Blocked Patio Table Tutorial

I grabbed a piece of 220 grit sandpaper and carefully sanded off my mistakes.

Color Blocked Patio Table Tutorial

Step 5 – touch up.

The stain needed a bit o’ touch up after my error correction. Same as step 3a here – just less stain.

Color Blocked Patio Table Tutorial

Color Blocked Patio Table Tutorial

Step 6 – protect.

I finished the table off with two coats of polyurethane to protect it from the elements. I usually prefer to use spar urethane for outdoor pieces because of its superior waterproofness, but this table is under a covered patio so polyurethane works just fine.

Color Blocked Patio Table Tutorial

Step 7 – relax and enjoy!

I absolutely love how the pink pops through the slats and peeks out from the underside of this table. It turned out exactly how I saw it in my head!

Color Blocked Patio Table Tutorial

Besides adding the table to the patio, I also added an outdoor rug so I don’t have to look at boring concrete while I’m hanging outside.

The rug situation is strange, actually… Back when I posted about my colander planter, I included a crudely drawn rendering of how I wanted the patio to look.

upcycle a colander into a planter

Then I go to Lowe’s one day and see this guy.

Color Blocked Patio Table Tutorial

Whoa. Seriously. Exactly what I drew. I’m some sort of rug prophet, guys. Serendipitous fo sho. I snagged it for just $30!

The patio has definitely improved!

Lets look at one more before and after, because we all love those, don’t we?

upcycle a colander into a planter

Color Blocked Patio Table Tutorial

I still want to spray paint my hurricane lanterns a fun color…

Color Blocked Patio Table Tutorial

But for now, the folks at jhbhq are quite happy with the outdoor living space here!

Do you have a tiny outdoor space like mine? What do you do to make the best of it?

A First Date With Chalk Paint

I’ve seen almost exactly 257 pins and blog posts about different chalk paints and the various projects that folks do with them.  Last Sunday morning I decided I wanted in on the chalk paint game.  This is how that went…

diy chalk paint stool makeover

If you remember (and thanks if you do), I bought a little sample of chalk paint during my visit to Fort Worth Vintage Market Days.  The brand is Oh Lola! Vintage Paint and the color I got was “Antique Egg Blue”.  I really wanted “Marseille”, a delightfully buttery yellow, but Yadi (the owner) said she sold out of that early.  I wasn’t surprised.  That yellow was hot.

Fort Worth Vintage Market Days

Anyway, when I bought the sample, I was already pretty much set on using it to update this pathetic little stool I had sitting around.

chalk paint stool makeover

You know the one.  Most of us have had or even still have one of these.  That sad little $10 blonde stool sold by that one huge retailer.  I actually got mine from the same warehouse sale where I bought my file cabinet that I painted.  It was maybe two bucks or something.  It seemed to have a checkered past, judging by the nicks and paint spills.

chalk paint stool makeover

Chalk paint was the perfect match for this stool.  If you didn’t already know, you don’t need to prep your surface when using chalk paint.  No sanding, no priming.  Just a wipe down to remove dust and dirt.  Also known as a lazy Sunday project dream.

So I broke out my tiny Blue Hawk brush and got to work.

chalk paint stool makeover

The first coat provided awesome coverage.  It was thick but not gloppy, and a tiny bit went a LONG way.

chalk paint stool makeover chalk paint stool makeover

I went ahead and did a second coat (after an hour long nap) since there were still bits of blonde wood poking through.

chalk paint stool makeover

This next part was a random idea that popped into my head after my nap.  I let the second coat dry for a couple of hours and then broke out my hot glue gun and a ball of polished hemp rope.  I marked the middle of the seat, glued the rope down and started working in a spiral from the center, gluing as I went.

chalk paint stool makeover chalk paint stool makeover

Always be careful with your glue gun, kids.  I’m currently sporting a less than sexy blister on my wrist.  Sometimes my arms get flail-y.

The final step was to pad the feet of the stool.  I was going to use some felt from my craft stash, but since I was already in the rope-spiraling mood, I went ahead and made cute little spiraled hemp foot pads.  I really did that part just for me, unless you want to come over and turn my stool upside down and take a look.  In that case, I did it for us.

chalk paint stool makeover

The stool ended up being a little more “farmhouse” than I expected, which isn’t really my style, but I kind of like it’s simplicity.

chalk paint stool makeover

I’m still not sure whether it has a permanent spot in my home, but I did enjoy making it!  The chalk paint was a lot of fun to use, and I’m excited to have another go at it.  I’ve got more than half of my 8oz sample left (I only needed about 3oz for this project) and I’m sure I’ll find a good use for it.

If you decide to try this yourself, you’ll need less than one ball of polished hemp rope (you can get it pretty much anywhere – even the dreaded W), a glue gun and about 20 glue sticks, chalk paint, a paintbrush and a smidge and half of patience.  Definitely doable for the novice and experienced DIYer alike!

What do you guys think about chalk paint?  Love it, hate it?  Do tell…

A Tale of Two Tables

I like to work with what I’ve got.  It’s a budget-friendly way to make fun updates to our home.  And that’s just what I did to two secondhand accent tables!

DIY Accent Table Makeover

Now, the first in this “table tale” actually got it’s original makeover almost a year ago, before I started this little site.  Lucky for you, I have pictures!

What started as a black framed glass-top table (sad)…

Before - Sad Little Glass Top Accent Table

Got a sassy new geometric top thanks to a stencil and spray paint (happy)!

After - Happy Little Glass Top Accent Table

Basically I printed out a geometric pattern that I loved, traced it onto some Martha Stewart stencil film with a permanent marker, used an X-ACTO knife to cut the pattern out of the stencil film (while binge watching HIMYM), and stuck the film to the underside of the glass top so I could paint over the pattern.  Make any sense?  Maybe these pics will help…

DIY Geometric Stenciled Table Top

Tip: I find that using an old gift card to smooth down stick-on stencils really helps to ensure that there aren’t any bubbles and the stencil is firmly in place.

I started with a few light, even coats of gray spray paint…

DIY Geometric Glass Top Table

Then I carefully pulled the stencil off (while the gray was still wet) and gave the entire thing a few light coats of white.  What resulted was a pretty geometric pattern on the underside of the glass!

DIY Geometric Glass Top Table

DIY Geometric Glass Top Table

I couldn’t decide whether I wanted to paint the frame or not, so I resolved to live with it as-is until I could make my mind up.

Fast forward several months later and I am definitely feeling that the black frame is too harsh for our living room and just doesn’t look right.

In the meantime, I had acquired the little orange accent table.  I bought it because the price and shape were right, but I wasn’t feeling the color.  I like orange, I just don’t really have a desire for it in my accent tables.  Plus this little guy had some scratches and dents…  Don’t mind that awkward vase – I have no explanation for it.

Before - DIY Matching Accent Tables

With furniture, color is almost never a deal-breaker for me.  Most pieces can be sanded and painted or re-stained, and it’s so fun to customize something to my own taste!

The funny thing is, these tables got together by pure chance.  I never even considered sticking them next to each other until we put up our Christmas tree.  We stuck them by the front door behind the couch to get them out of the way, and that’s when the light bulb went on above the ol’ noggin.

I decided they both wanted to be yellow since we have yellow in other places in the room, and the (formerly) orange table would get a gray top, so it would play well with the gray and white glass top on the other one.

I primed them both with Zinsser B-I-N (my favorite); the black frame with spray and the orange table with liquid.

Primed Metal Accent Table Frame Primed Wooden Accent Table

I’ve mentioned before that I have a weakness for the Lowe’s Color Studio samples, and the paint used for this project was no exception.  They were part of the Lowe’s Color Studio Fall / Winter 2013 pallet.

Valspar Delightful Moon / Cathedral Stone

Delightful Moon / Cathedral Stone

I ended up hand-painting both tables.  I know what you’re thinking – wouldn’t it be easier to spray the metal frame instead of hand paint it?  The answer to your question is absolutely yes it would be easier.  But I couldn’t find a spray paint that I could be certain would match the Delightful Moon, which I was swooning over.  And I’m a bit OCD about things like that.  I needed an exact match.  The black frame took three coats of paint and the orange accent table only needed two.  No progress pics of the black frame, so imagine me laying on my floor with a foam brush in hand carefully and painstakingly painting the thing, k?

DIY Painted Accent Table

Now before I go further I want to take a minor “non”-stance on something – many people cut their latex paint with a thinner (like Floetrol) or use oil based paint / lacquer to minimize brush strokes.  I don’t mind brush strokes on some things, and this table falls into the “some things” category.  The brush strokes are barely even noticeable.  If it were the focal point of the room I may be singing a different tune…  But it isn’t, so I’m not.

Let me go back a bit, the orange top needed a little pizzazz, since it’s geometric counterpart was so fancy, so I opted to use the same textured wallpaper I used on our media stand, my frame in my cubicle and the frames above our bed (which I’m still not in love with).  I cut the wallpaper to fit the top before I painted the table, and when the table was primed, I soaked it and stuck it to the top.  I waited 24 hours before attempting to paint it, and then this happened:

DIY Accent Table

I must have taken the wallpaper out of the water it was soaking in too early.  I can’t seem to find the instructions, so I suppose I threw them away.  Fail.  But no matter, Mod Podge to the rescue!

I went ahead and painted the base of the table yellow, and then mod podged the wallpaper to the top (I used the gloss finish, because it was what I had on hand and therefore free).  It worked perfectly!

Once the mod podge dried, the top got three coats of Cathedral Stone.  As with many paint jobs, it was looking a bit funky after the first coat.

Accent Table Makeover

But by the third coat it was looking great!  I wish the gray translated better in pictures – it reads really lavender here but its very cool bluish gray in person.

DIY Accent Table Makeover DIY Accent Table Makeover

The tables fit perfectly between the couch and our front door.  I really wish I could put a cute sofa table there, but then the fella and I would be seriously lacking in the walkway department.  These were never intended to be long term pieces, but now that they’ve gotten a face-lift, I may change my mind!  For now, they’re perfect for us to set mail or our keys on when we walk in the door.  How about one last pic before you go?  Here is the final before and after:

Before and After

How do you work with what you’ve got when you decorate or organize?  I do love sharing creative ideas.  Do tell…