
Folks, just about everything at our place gets a paint job if it holds still long enough. And that includes a dinged up old metal file cabinet! The fella and I found this baby on Craigslist for a cool $25. MUCH cheaper than buying brand new. And of course I gave it a little style and sass with color-blocking!
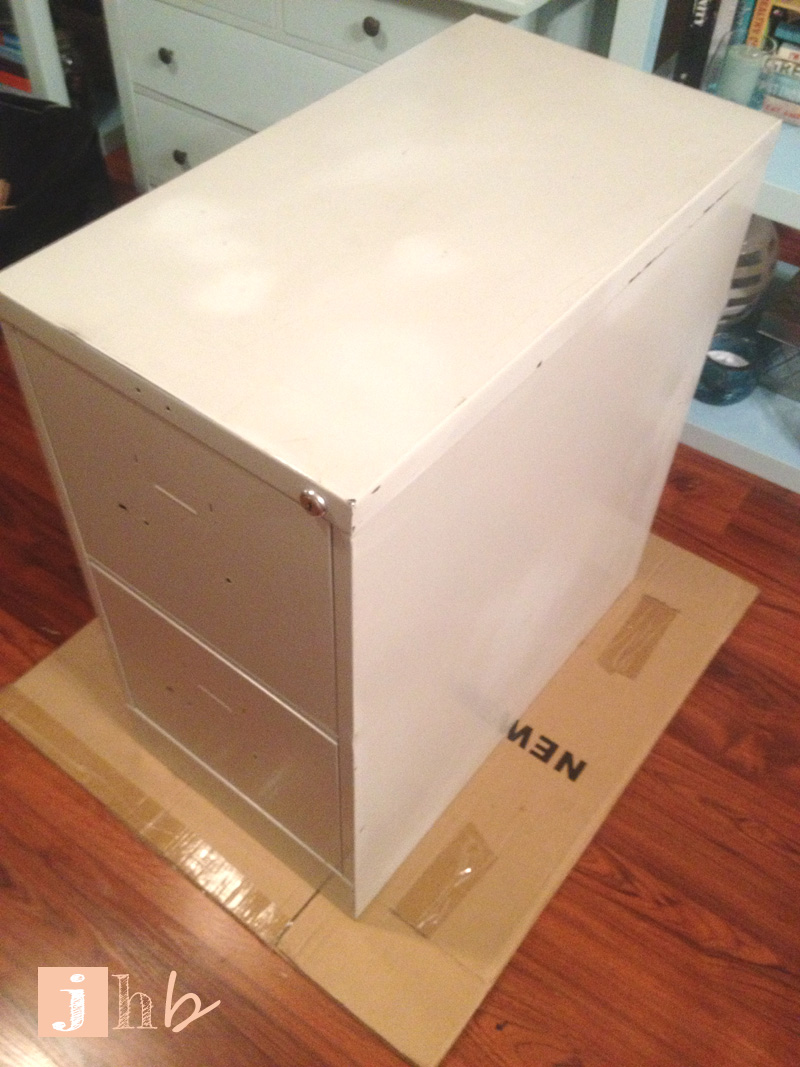
The seller actually has a huge warehouse full of school and office surplus in used condition. There were tons of neat items that filled me with nostalgia and memories, but the only item that was a practical purchase was the file cabinet. We could have used it as is, but I couldn’t stand to look at its sad, drab face. So I gave it a face lift! Before I started, I put the cabinet on risers, which are actually just leftover table legs from my LACK Hack project… This way the cabinet wont stick to the trash bag plastic drop cloth once its painted.

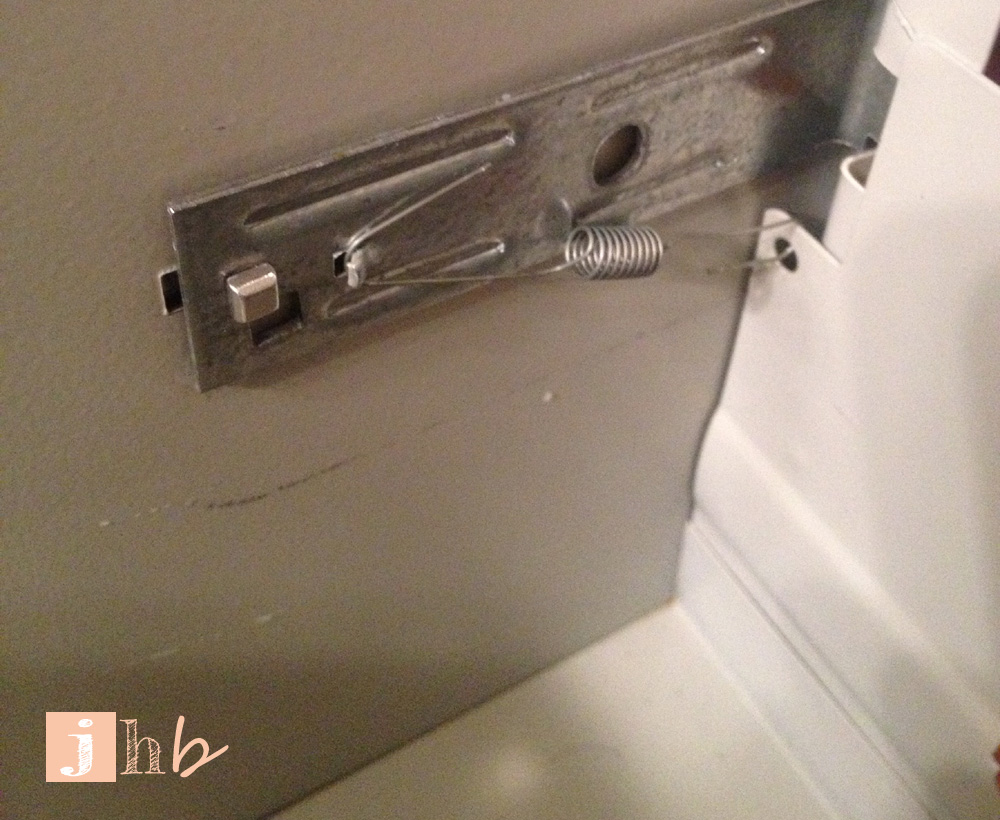
Before painting, I took the hardware off. I’m not an expert in file cabinet assembly, only organizing the files in it. So before I removed the handles, latches and label holders, I used the highly scientific method of taking a picture of the latch mechanism, so I’d know how to put it back on when the time came. I’m a genius.
I applied a couple of small strips of Frog Tape over the holes from the hardware to protect the inside of the cabinet from paint drips. I also covered the lock with Frog Tape to prevent rogue paint swipes from messing it up. I didn’t want to remove it, for fear I’d mess it up and render it useless.

If you’ve read any of my other posts (thanks!) you’ll know that Zinsser B-I-N is my go-to primer. For Pete’s sake, that stuff sticks to air. No kidding. So this file cabinet got a coat of the ol’ B-I-N.

And then there was the boring wait for the primer to dry. I have this habit of adding more dry time to whatever the manufacturer’s instructions state. I live in North Texas and the humidity here is pretty much a year-round thing. Better safe than sorry I say.
After the longer than usual wait is the fun part… Painting! This file cabinet sits in our guest room / office. It lives with a gold shelf (can’t wait to share that project on here) a white writing desk and a guest bed with green and white bedding. The room is no where near where I want it to be. Baby steps. But I am a tiny bit closer with this little project! I’ll pause while you enjoy the schematic I sent to the fella to give him an idea of what I wanted the cabinet to look like.

To achieve the diagonal line, I used a yardstick and pencil to trace a line from the top right-hand corner to the bottom left-hand corner.

The paint I used was some that I actually already had on hand. It was part of the Lowe’s Color Studio 2013 Spring Palette.

I just happened to be at Lowe’s shortly after they were released and bought samples of a few of the colors. Same thing happened when the 2013 Summer Palette came out… I can’t help it! The samples are inexpensive and go such a long way!
So the “bottom half” got two coats of Polar White, then I taped over my pencil line, and the “top half” got two coats of Sweet Mint. There were about 24 hours worth of dry time between each coat, since this was done on weeknights after work.

And what about the hardware? Well they got the gold spray paint treatment! No progress pics of that but the gist is that I cleaned ’em, spray primed ’em and gave ’em several light coats of gold spray paint. I gave the whole thing two coats of polyurethane (I use Minwax) and let it dry for… You guessed it… a couple of days longer than the manufacturer’s instructions suggested. Then I popped the hardware back in (thanks to my handy photo that showed me how to reconnect the drawer latches).
Voila! A pretty, pretty color-blocked file cabinet!!

I thought the fella would hate it, I mean it is a bit feminine, but I think he’s just happy to have a place to organize his paperwork (those Air Force guys, they have a LOT of paperwork). I love how pretty it turned out. And I still have about half of each paint sample left over for future projects! I’m tellin’ ya, those things go a LONG WAY. Here’s a side by side so you can see how glorious it looks after a little TLC.

I’ll admit, I’m a bit nervous about the paint chipping, since the metal surface of the cabinet is zero percent porous, but I have faith that my trusty B-I-N is up to the challenge of keeping the paint in place. I’ll definitely post an update if the paint starts to come up.
In the meantime – anyone else taking steps to a more organized life or visiting giant warehouses full of cafeteria tables and science lab equipment? Do tell…

Love this idea Jamie! Keep the inspirations coming:) Going to share this on Facebook…..it is so awesome how one piece of tape and some paint can make something new again!!
Thanks Tracie! This was definitely a hairbrained scheme that paid off!! 🙂
Love love love! So fresh and new again! Sharing on Facebook:)
xo
Tracie:)
Pingback: A Tale of Two Tables | jamie's home blog
Pingback: Craigslist Catch: Mid-Century Dining Set | jamie's home blog
Pingback: A First Date With Chalk Paint | jamie's home blog
Hi there! Would you mind if I share your blog with my twitter group?
There’s a lot of folks that I think would really appreciate your content.
Please let me know. Thank you
Al tiempo, este weblog les dejará enriquecerse con las opiniones y experiencias de los lectores.
Did the paint chip at all? I’m a teacher thinking about painting my file cabinets to match my classroom!
Hi Sarah! I wish I had an answer for you! I no longer own the cabinet (left behind when I exited a previous relationship). I will say that if you want a tried and true paint for metal – I’ve got a lot of experience with Rustoleum spray enamel. It bonds to metal really well and stands up to the elements so I know it would be great for an interior piece. Just make sure you apply it outside or with great ventilation and EVERYTHING covered well that you’re not painting. The little particles of overspray can travel!