DIY Bangle Bracelet Inspired by Kate Spade Saturday

When I buy scarves, I always keep the ring they come on…  The process happens something like this:  I get home (probably from Target) with my spoils, take the scarf off of the ring it hangs on, put the scarf on and cheese at myself in the mirror, put the ring around my wrist and think “I bet I could make a really cute bangle out of this scarf ringy-thingy”.  True story.  So I totally did that.

diy bangle bracelet inspired by kate spade saturday

My inspiration came from Kate Spade’s Saturday line.

diy bangle bracelet inspired by kate spade saturday

IMAGE SOURCE

This bracelet is the bees knees you guys.  I had to put my spin on it.

I grabbed a couple of coordinating fabrics from my stash.  The solid mint colored fabric is actually part of a twin sheet I bought at a local thrift store for 50 cents!  I bought an absurd amount of the flowery fabric at a last chance rate of about 70c per yard.  I’m not even a flowery fabric person, y’all.  It just spoke to me.

diy bangle bracelet inspired by kate spade saturday

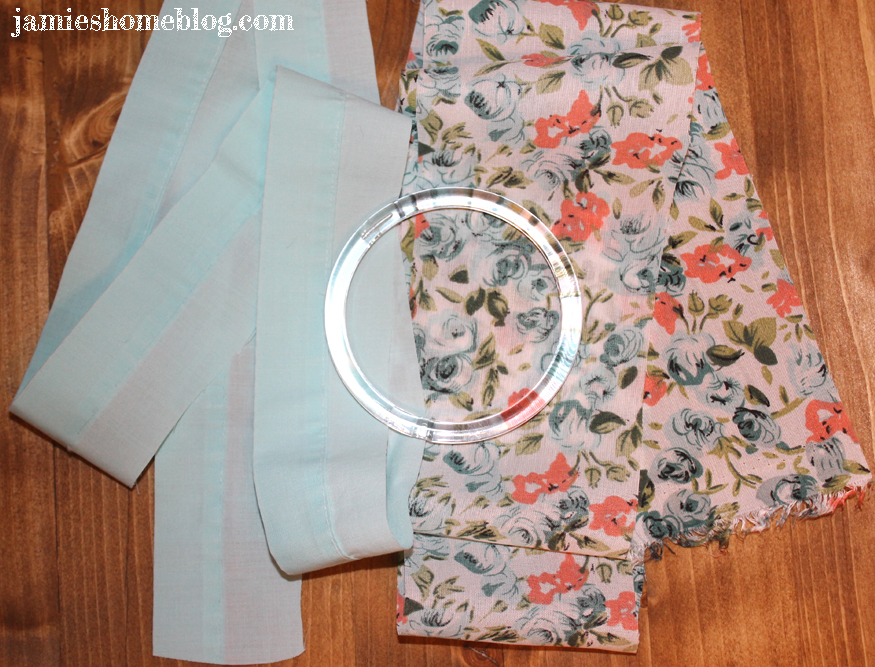
I used part of the hem on the sheet to save myself a step.  That step was folding and ironing, which I did with the flowery fabric.

diy bangle bracelet inspired by kate spade saturday

Once I had ironed a nice crease into my flowery fabric, I sewed both pieces together, the flowers overlapping the solid mint.

diy bangle bracelet inspired by kate spade saturday

In case you’re wondering, my sewing machine is older than me (by about 20 years) and works like a velvety chocolate dream.  It’s a Singer 237 Fashion Mate, and along with sewing skills, its one of the best gifts my mother ever handed down to me.  It doesn’t do all the fun things that newer machines do (like fancy stitches and embroidery) but it’s utilitarian value can barely be measured.  I’ve made curtains, purses, shirts and several pillow cases with her in the few short years since my mother gave her to me, and I used it for countless other crafts growing up.

diy bangle bracelet inspired by kate spade saturday

diy bangle bracelet inspired by kate spade saturday

Moving on… Once the two strips were sewn together, I wrapped them around the ring, putting a dab of Alene’s fabric fusion on the inside of the ring with each wrap.

diy bangle bracelet inspired by kate spade saturday

There isn’t really a seamless way that I can find to seal it off, so I just wrapped and trimmed the end as cleanly as I could, put a healthy dab of fabric fusion on and clipped it with binder clip to make it stay put while it dried (about two hours).

diy bangle bracelet inspired by kate spade saturday

I love the way it turned out.  Hashtag arm party, y’all.

diy bangle bracelet inspired by kate spade saturday

I actually ordered a Kate Spade one as well, half because its so cute and half because there’s a good cause behind it.  You can read more about the cause on Saturday.com.  They didn’t sponsor this post, btw (calling Kate Spade, please sponsor my posts lol) they were just my inspiration and I thought the charitable aspect was worth mentioning.

Anyone else out there diying cute jewelry?  Do tell…

Hablas Español? Parlez-vous Français?

Baxter!  You know I don’t speak Spanish!

Actually, I do speak a small amount of Spanish and an even smaller amount of French but I think we all know what si and oui mean, no?

Here’s a cute little rustic sign I made for my Wall of Wanderlust.

diy rustic wood sign

When I made my mid century nightstands (more on that here), I used a wood scrap to color test my Danish Oil.  It sat in my scrap pile for months, until I got a wild hair to make it into a little sign.  One of those use what ya got projects, ya feel me?

diy rustic wood sign

The process here is pretty basic.  I used a sponge pouncer with white acrylic paint over a stencil to paint my letters on my scrap wood.

diy rustic wood sign

Here’s a fun little gif of the process.

diy rustic wood sign

To speed up the drying process since my stencils had to overlap, I used a hair dryer on the cool setting to dry each letter for about a minute.  As you can see in the gif, I used some washi tape to hold each letter steady while I dabbed my paint.

Then I painted the sides white, since there was a bit of finish overlapping onto them.  After doing the top side, I taped down the rest of the sides to make my lines more crisp.  I don’t have the steadiest of hands, guys.

diy rustic wood sign

diy rustic wood sign

Since the sides were bare, dry wood, they only took a few minutes to dry.  I flipped the board over and attached a sawtooth hanger (after measuring and marking the center of my board).

diy rustic wood sign

diy rustic wood sign

Then a quick tap-tap with my hammer and a nail on my wall and boom, this guy was right at home on a wall with French and Spanish postcards and maps and stuff.

diy rustic wood sign

I may decide to seal it at some point with polycrylic or something similar, but I kind of like the matte look it has.

Not bad for a little hour-long “I’m bored” project on a Sunday morning, oui?

Anyone else making multilingual wall art?  Por favor dime…

This is Why You Always Clean Your Brushes… Completely

Hey internet.  So… after proclaiming a couple of weeks ago in my blogiversary post that I’d like to be on here more often, I went silent.  There are a host of things happening at “jhbhq” (good and not so good) that have kept me away.

Namely, the feller (my mega-handsome boyfriend, whom I’ve known for around 13 years, and have been dating for almost the last four of those) is on a little overseas visit with the US Air Force.  Over the last couple of weeks, as we prepared for his impending departure, my efforts and attention were focused on enjoying our time together, not my diy and craft projects.  I mean really look at this guy…

Feller

I’ve basically been vacillating between being super proud of my Airman and weeping because I can’t share life’s daily adventures with him.  Luckily for me, my bestest friend won’t be gone very long.  Luckily for you, I am going to do my best not to whine about it.

That being said, I now have amplified free time in the event of his absence, so you may see lots of little crafty crafts on here, along with some larger projects that are both in-progress and in the pipeline.  For now I’m going to pop in really quick to show you how I royally screwed up one of my in-progress projects.

this is why you clean your brushes properly #diyfail

Friends, when you use oil based primer, you have to clean your brushes thoroughly with mineral spirits if you plan on ever being able to successfully use them again.  I do this every time I use oil based anything.  Including the last time I used this brush (a Blue Hawk brush for oil based paint).

this is why you clean your brushes properly #diyfail

But…

As you can see from the picture, I half-assed it.  Admittedly, when I last cleaned the brush, I was having serious trouble getting all of the primer off (probably because I waited a smidge too long to clean it), and I’d been at it for what felt like a half hour, and it was late at night, and I was hungry, and I had to get up early the next morning for work.

So I said “Self, these last flecks of primer are NOT leaving this brush.  They live with this brush now, and they will do so until the brush dies.  They’re faithful little primer stains that won’t ever come off.  Not even the next time I take out the brush and use it.”

And then yesterday, when I dipped the brush in some polyurethane and brushed it onto this carefully painted black surface, those flecks dropped from that brush like it was their job.  Ahem.  It WAS their job WHEN I WAS CLEANING THE THING!  And now my black surface looks like some sort of janky constellation map.

this is why you clean your brushes properly #diyfail

Now that I’ve spent a day pouting about it, I’m able to share it with the world in hopes that you wont be as lazy as I was the last time I cleaned this thing.  I’m not sure how the heck I’m going to fix my project but I’m going to spend the weekend trying.  Hopefully my next post about this project will be a reveal and not another #diyfail.

Today’s takeaway:  Don’t be lazy, clean your brushes properly, and in a timely manner.  If you have some walking around sense, you’re buying good brushes, and replacing them after each use just isn’t practical.

Have you made a lazy mistake during a craft or diy project?  How did you fix it?  Anyone have any suggestions as to how I should remove white flecks from polyurethane without damaging the black surface beyond repair?  Do tell…

Blogiversary – Year One: Done

Friends, today marks exactly one year (!!!) since the first time I mustered the courage to post about my little diy and craft projects online.

Let me first say that I am so thankful for every single reader and every last view my posts get.  I cannot express that enough.  Thank you.  All of you.  I started this blog to share my DIY and decor adventures – good and bad – with the world in hopes to provide relevant information to other diyers out there.  I hope I am accomplishing just that.  But even if I’m not, the friendships I’ve made and the community I’ve found on this adventure are a huge and important piece of my life, one that I am happy to have and excited to grow.  In short, you guys rock my socks.

Now, if I may move on from the mushy stuff, I will say that although I’ve learned a lot on this adventure, I know there is much more to discover.  I am committed to continually improving the content I post here.

One area that I am excited to work on and develop is photography.  Being a visual, pinterest addicted, pretty image lover – I am aware that my shutter skills are… ahem… quite lacking.  For the past year (and several years before that) I’ve been taking photos with my point-and-shoot.  The one that I bought when Canon first released their digitals with colorful bodies (mine used to be a vibrant blue but has faded considerably).  It’s old.

IMG_0063

While this camera is wonderful in many situations, a poorly lit condo is not one of them.  My pictures are just, well, flat.  On top of the lighting being bad in here, I also face the challenge of night photography.  Being away from the house a minimum of 11 hours per day for work and doing my best to tend to my social life on weekends means most of my pics are taken after 8pm.  Not so bueno.  So, as a one-year-blogiversary present to myself, I went out and got my first big girl dSLR!  I’ll pause while you snicker at the absurdity that I’ve taken a fuzzy cell phone picture of a fancy camera….

new swag

I’ve read lots of reviews and have been watching sale sites for this guy, and when the opportunity arose to get one at a crazy good deal, I pounced.  The Canon Rebel T3i is supposed to be a great beginner dSLR, and I’ve been a big fan of my Canon point-and-shoot, so I’m really excited to push and challenge myself with this brand new hardware.  Here are some pics of The Turk (who was quite curious of the cam) that I took right out of the box on full auto.  Not works of art but definitely an immediate improvement to the point and shoot.

The Turk The Turk 2

Another area where I want to improve is content organization.  My tags and categories need a re-work, so you may or may not see some minor changes here and there in that arena.

I also want to be better about posting more of my projects / crafts here.  I do at least three a week – I should be writing about them.

Enough of my declaration of accountability, though.  Here’s a gallery of a handful of my most popular posts over the past year.

Thanks again to all of you fine folks for sparing some of your time to visit my little corner of the internets.  Here’s to many years to come!

xo,

Jamie

Mother’s Day DIY Version 2.0

Happy Mother’s Day to all the Super Moms out there!

Last year, I shared the garden markers that I made for my Mom as a Mother’s Day gift, and in keeping that tradition, I’m back to tell you about the gift I made for her this year!

manicure in a jar

This sweet mani-pedi kit is so cute and really easy to personalize.

Supplies

  • Mason jar
  • Cotton balls
  • Nail tools (clippers, orange stick)
  • Nail polish color(s)
  • Small homemade lotion bars (optional)
  • String or ribbon
  • Card or nametag

manicure in a mason jar

Pick a polish color (or even two or three) that you know your mom likes, or even one that she might not normally try that suits her.

Lotion bars, like these I just posted, are a sweet handmade touch that any mom is sure to appreciate.  The size I made is perfect for this set!  I wrapped them in saran and secured the back with washi to package them.

manicure in a mason jar

Just like I did with the sugar scrub that I made as Christmas gifts, I covered the lids of the mason jars with fabric.  This is optional but makes the jar cuter, so why not, right?

manicure in a mason jar

It’s as easy as purchasing the items and putting them in the jar, friends.  Finish the Mani for Mom jar by tying a name tag or card onto it with a cute ribbon or string.  I used decorative baker’s twine and some plain note cards in which I stamped “Happy Mother’s Day” and “Mani for Mom”.

manicure in a mason jar

Your mom (or whomever you choose to give this to) is gonna love it!  I made three, one for my Mama, one for the fella’s Mama and another for his sis-in-law (who is the Super Mom to our adorable niece and nephew).  They turned out so cute!

manicure in a mason jar

Did anyone else make mom a gift for Mother’s Day?  Do tell…