
I know I’m a bit behind with this post – I’ve experienced some technical difficulties in recent weeks. Boo. Better late than never, I say!
This post is dedicated to one very special person in my life… my Mom. She has always been a pretty crafty woman. She is a superb seamstress, friend to refinishing furniture and gardening guru to name a few of her great qualities. I love making gifts for her on special holidays because I know how much she appreciates the effort just as much as the finished product. Last Mother’s Day I made her some coasters inspired by this and other popular pins on Pinterest. I put some sweet quotes about why Moms are so great on the first three and used a picture of her with me and my sister on the last one. She loved them! And they use them all the time! This year I decided to use my DIY skillz (’cause I got em, yo) to make her some plant markers for her veggie garden.
Let me talk about her veggie garden for a moment. My mom has the greenest of thumbs. I love that she enjoys growing vegetables because that means I get to eat fresh peppers and herbs while I’m over there, and even get to take home the occasional squash. Yum!
She and my Dad built and stained these raised planters from scratch so that she would have the perfect spot for her tomatoes, hot peppers, zucchini and more. Aren’t they great?!

I thought plant markers would be a perfect addition.
I’ve seen a ton of cute ideas for garden markers all over Pinterest. This pin was by far my favorite! Stuff that you serve food in to label the food you’ll get to eventually eat? Sign. Me. Up.
So I headed out on an adventure to pick up my supplies. I purchased two 4-packs of inexpensive bamboo spoons. I thought about duplicating the look of the original project (at Little Green Fingers) by using some letter stamps I had in my stash, but decided I wanted to put my own spin on the spoons. Keep reading to see how. Or just scroll to the bottom to see the reveal, I don’t mind! You just do you.

Here is my listy list of supplies:
- Wooden spoons
- 3M Sanding blocks in medium and fine grit
- Varathane wood stain in “Sunbleached”
- A lonely sock
- Mod Podge photo transfer medium
- Pictures of vegetables
- X-ACTO craft knife
- Minwax Helmsman Spar Urethane
- Newspaper to protect my work surface
I got to work sanding the spoons, first with medium-grit sand paper and then again with fine-grit to get the surfaces nice and smooth. Then it was time to give these babies a coat of stain! I really liked the idea of the soft grey against the leafy green plants and sage-y green planters.
I applied the stain with the lonely sock mentioned in my supply list and let it soak for the recommended ten minutes to penetrate the wood. Then I took the clean end of the sock and wiped off the excess stain. This is where the newspaper made its first appearance. Gotta protect the ground in my courtyard!

I would recommend wearing some sort of hand protection during the staining process. I keep a box of latex-free first aid gloves on hand (pun intended) that I use while staining, spray painting or any other activity where my skin (or manicure!) could be compromised. I let the stain dry for two days instead of one – I wanted to be sure that it would be dry for this next part!
It was time to transfer images on to the spoons. I found some really cute images of different veggies on the internets and printed them out on regular weight paper with my printer properties set to photo quality. My X-ACTO was the perfect tool to cut the tiny veggies away from the bulk of the paper.

I laid the freshly cut veggie pics (pun intended again) out on the spoons to be sure I had the configuration I wanted.

Then I used Mod Podge photo transfer medium to get the images off of the paper and on to the spoons. When using transfer medium, keep in mind that your images will be reversed! If you’re transferring words you’ll have to flip them in photoshop or some other program before printing them out. The transfer goo is super cool. First you paint a fairly thick layer directly on your image, thick enough to where you can no longer see the picture. I painted about 1/16″ of goo onto each tiny veggie. You then carefully lay your picture down where you want it to be transferred and softly smooth out any bubbles. Then you wait. At least a full 24 hours.

Once the 24 hours had passed, the next step was to reveal the images. The directions say to wet the paper and firmly rub it with your fingers. The paper comes off and what’s left behind is a sturdy version of your image that has an almost vinyl-like texture. The images transferred beautifully! I was not as careful applying the medium as I should have been, though. There were a few dots of dried goo outside of my images. I just carefully scraped those off with my X-ACTO. The spoons were almost done!

I just needed to protect them from our crazy North Texas weather… Problem was, I didn’t get the photos transferred until the night before Mother’s Day. For shame. So I planned to present them to my mom in their current state and spray them with sealer after, so that the protective finish wouldn’t be ruined by my presentation. I used a cute little white and grey planter and decorative rocks to display her sweet new veggie signs. Both items were $1 each at the dollar store! Woot woot!

On the day, I gave them to Mom and then sheepishly explained my incomplete present faux pas. A little later got busy finishing the spoons up. I hadn’t used Helmsman Spar Urethane before but I’d read several positive reviews for it online so I thought I’d give it a go. Like with any spray paint or sealer, or tool for that matter, always follow the manufacturer’s instructions and protect yourself as much as you can! I always wear eye protection, a respirator mask (like this one), gloves and clothing that I am not attached to when I’m getting my spray paint on. I would be mega sad if I got paint stains on my favorite summer shorts! I was really pleased with the Spar Urethane. Even though the dry time is around 5 days (thanks for the help, humidity) the end result is worth it! They are super durable now! Disclaimer though – the sealant does not protect against red heeler puppies. Bummer.


Check the spoons out in their new habitats!

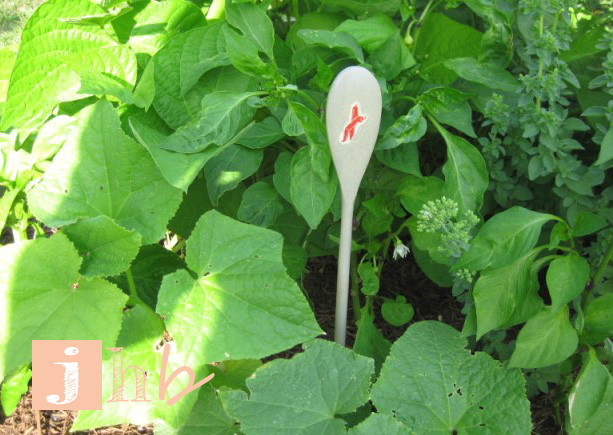

My mom can tell her plants apart without them but that’s not as much fun as looking at these super cute markers!
Did anyone else DIY a gift for their Mom or another special woman in their lives for Mother’s Day? Or do you just want to gush about how awesome your Mama is? Do tell…

Bennett says sorry Aunt Jamie! I didn’t mean to chew Gangy’s spoon! I hope you still wuff me! 🙂
Love you seester! I am continuously impressed with your skill and perky writing style! Keep ’em coming!
Pingback: Super Simple Sugar Scrub | jamie's home blog
Pingback: Mother’s Day DIY Version 2.0 | jamie's home blog
Pingback: My Healer | Managed Mania
Pingback: Mother’s Day DIY No. Three | jamie's home blog