Category Archives: Home Decor

My Key Lime Green Mirror

It’s the New Adventures of Old Mirror up in here, dudes.

A friend gifted me this mirror a couple of years ago. It didn’t match my stuff, but I knew it was a great piece that I could somehow work with, so I happily accepted her generousity.

green spray painted ornate antique mirror

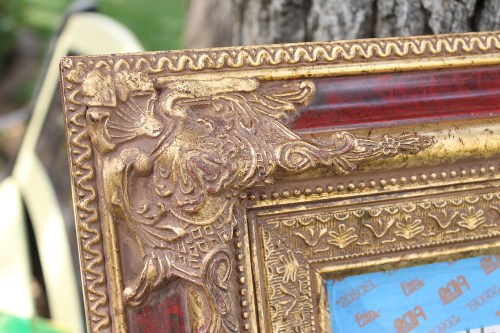
First off – this thing is big. Like, 38″ x 48″ x 2″ and heavy big.

It was very classic and traditional in style, with several embellishments on its red and gold frame.  In all of its intricate crevices, there was a decent layer of clay-like, caked-on dirt.

green spray painted ornate antique mirror IMG_2147

I knew that spray painting it a fun, bright color would accomplish two very important things: a) it would match my stuff and 2) I would like the looks of it more!

But first I had to clean it. I tried jut blowing the dirt off with my hair dryer first. Ha! That dirt didn’t budge. Then I tried soapy water with a toothbrush. That just turned the dry clay-like dirt into wet clay-like dirt, and moved it around but didn’t clean it off. Also, after it took me a whole five minutes to cover about one square inch with the toothbrush, I ditched that method.

This is when I temporarily “gave up”. Do you ever do that? Lots of times I get frustrated with a project and I bail. Ninety percent of the time I go back and finish but sometimes, the juice just ain’t worth the squeeze.

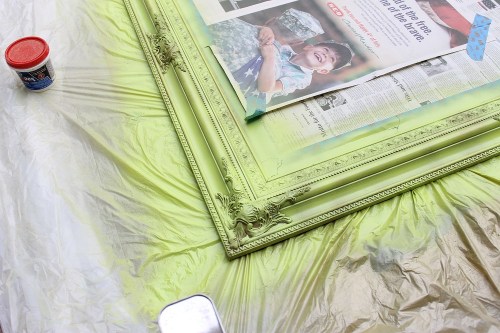
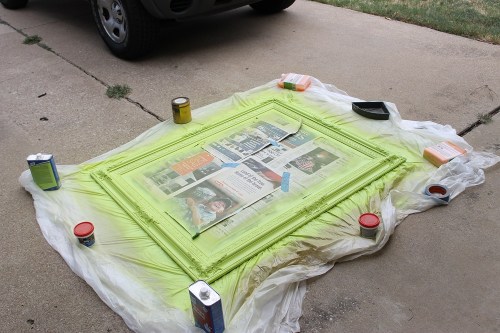
Anyway, my final attempt to clean the frame (two weeks later) came in the form of a thick-bristled cleaning brush that I used to dry-brush the dirt off of this thing. You guys, my arm got SOOO TIRED. I brushed it as hard as I could for a good 45 min. Then I thought, “okay, if the dirt isn’t coming off with this much force, I’m just gonna spray paint right over it and hope for the best”. And that, friends, is exactly what I did.

green spray painted ornate antique mirror green spray painted ornate antique mirror green spray painted ornate antique mirror

Check out how great it turned out!

I had zero issues with the spray paint adhering, and I’m confident it will hold up well over time.  My best tips and tricks for spray painting household objects can be found here.

I used Rustoleum Painter’s Touch 2X Ultra Cover Paint and Primer in One (say that ten times fast), which I’ve used before with great success. The color is called Key Lime and I used the gloss finish.  I feel like changing the finish of this very ornate mirror to a high-shine, vibrant color creates such a fun juxtaposition!

I hung it over my 2×4 expedit unit in my dining room, and I love it there, but I’m already staring to redocorate the room around it in my head!

Before:

IMG_2164 IMG_2165

After:

green spray painted ornate antique mirror

That builder’s special boob light has GOT to go.  And I’ve already got a plan to IKEA-hack that expedit.  And I need to do something with that wall on the right.

I really need to find that elusive affordable tulip style dining table I’ve been searching for to give this room a little more cohesiveness. Plus, once I refinish my sexy cantilever dining chairs, they’d look preeeety handsome pulled up under a tulip table, yes?

Anyone else working on giving new life to an old item? Hit me up in the comments!

Advertisement

How To Stretch Jersey Knit Cotton

Most of us have had that sinking feeling… The t-shirt you bought at your favorite concert, or those super comfy pj pants you love, accidentally got washed in hot water. Now you’re running around in crop tops and highwaters. Bummer. Or are crop tops back on trend again? Either way.

how to stretch and unshrink cotton jersey fabric

If you’ve got something made of jersey fabric that has shrunk and needs to be re-sized, give the below method a try to get your item back to it’s original shape… Or at least close!

I had to do this with my diy Shibori curtains, which shrunk about a foot and a half during the dyeing process.

You’ll Need:
*Hair conditioner – nothing fancy, anything will do
*Sink, tub or vessel to soak your item to be stretched
*Water
*A helper if your fabric is large like mine

Step 1: Put hair conditioner in your vessel. Use enough to make the water feel slick – an oz or two if you’re stretching a shirt in the sink. I used about 6 – 8 oz for my curtains in this plastic bucket. Make sure the conditioner dissolves completely.

how to stretch and unshrink cotton jersey fabric

Step 2: Fill your vessel with tepid (NOT hot or cold) water. I used water straight from the hose and let it sit for a while so it could warm up. Being that it’s August in Texas, it didn’t take terribly long.

how to stretch and unshrink cotton jersey fabric

Step 3: Soak garment. Fifteen minutes or so should work for your average garment.

how to stretch and unshrink cotton jersey fabric

Step 4: Wring out excess moisture. Many people around the internets say to wring it while wrapped in a towel. That wasn’t possible for me since my panels were so big, and I found that it wasn’t necessary to accomplish my end game. I just squeezed out as much water as I could while still keeping the fabric damp.

Step 5: Here’s where you may need another human to help, depending on the size of the item you’re trying to fix.  You want to pull gently but with enough force to make a difference on opposite sides of the fabric to stretch it.  For these panels, my handsome helper and I folded them lengthwise until they were only about 8 inches wide and then we each gripped our hands all the way around the panel in the center, and slowly pulled outward until we each reached our end.  I wish I had photos of this part of the process but sadly, I don’t.

Step 6: Line dry.  Gravity itself should keep your garment or fabric in it’s stretched out state.  I’ve seen posts on the internet about weighing down your edges, but it just wasn’t necessary for my curtain panels.

how to stretch and unshrink cotton jersey fabric

That’s it!  This method works so well on cotton jersey fabric.  As I said, my curtains shrunk about a foot and a half during the dye process, and by following the above steps, I got them back to their original size!  To date, they’re one of my favorite DIYs!

diy shibori tie dye curtains

Do you have a tried-and-true method to stretch out shrunken fabric?  Share it in the comments!

Concealed Media

The title of this post totally sounds like a name of a production company or cheeky pop-punk band, no? #randomthoughts

concealed media storage

I crossed something off of my to-do list!  Crossing things off of lists is really satisfying, wouldn’t you agree?

It also satisfying for me when I fix something that irks me.  I love playing Nintendo and watching DVDs, but it irks me to have media visible.  It’s just too busy to be visually attractive.  I store all of my media in this beautiful scandinavian-style cabinet, which I adore, but I had to do something about the fact that you can see inside.

concealed media storage

I have several options in my craft stash that would look nice behind the window panes of these cabinet doors – scrapbook paper, cork, mountains of scrap fabric.  I ended up going with textured, paintable wall paper that I had leftover from a dresser redo (my first post on the ol’ blizzog!)

concealed media storage

I measured posterboard panels that overlapped the glass panes by about an inch.  Because my cabinet doors were longer than the length of one piece of posterboard, I cut a few pieces at the right width and taped them together.  High tech stuff.

concealed media storage

I attached my wallpaper to these panels using mod podge instead of the adhesive thats already on the back of the paper, because the former is much less messy and time consuming than the latter.

concealed media storage

concealed media storage

I still have about two-thirds of my sample pot left of Valspar Greek Tapenade, which I used for my Instax photo display shelf. Why did I choose to use it for this project, too? I. LOVE. THIS. COLOR. SO. HARD.

concealed media storage

I used this same paint on my “FRIENDS” style picture frame around my peephole (see below pic), and I have other plans for it as well. Sometimes those little samples go a long way!

inexpensive small space decor

Once the paint was dry (two light coats), it was time to affix it to the inside of the cabinet doors. Guys, this part was so easy… I used double sided tape.

concealed media storage

The best part? They aren’t permanent, so if I change my mind (entirely possible), I can pull them down lickety split!

Doesn’t it look much better now that you can’t see my collection of horror movies and every Nintendo system ever made?

Do you prefer to conceal your media items, or do you like leaving them out in the open? Let me know in the comments!

DIY Shibori Curtains

I love it when I have an idea that makes folks tell me I’m crazy, and then makes them eat a hearty plate of their words once said idea has been executed.

Try telling people that you want tie-dye curtains.  Their reactions will be a fun experience, I promise.

diy shibori tie dye curtains

Shibori is a Japanese form of tie-dye that produces beautiful, intricate designs.  This isn’t your average Grateful Dead, rainbow tie-dye, dudes.

This wasn’t nearly the easiest project I’ve done, but the end result is amazing.  Lucky for you, I’ve written this tutorial, so if you’d like to make your own Shibori curtains, you’ll know what you’re in for.

Materials:
*Natural fiber fabric (I used jersey)
*Two large plastic buckets (one for dye bath, one for rinsing)
*Fabric dye (I used my favorite, tried-and-true Rit Dye)
*Appx one cup of salt
*Water
*Twine
*Long dowel or stick to stir your dye bath
*Fabric scissors
*Gloves

diy shibori tie dye curtains

You’ll want to start by ordering a pizza and picking up some beer, because you’re going to need to entice your friends to help with this.  I had the assistance of both of my parents and my little sister and it STILL wasn’t easy.

The first thing I had to do was cut my fabric to size. I purchased one massive length of fabric for three panels because that way I could use my Hobby Lobby 40% off of one item coupon. I ended up paying $33 instead of $55! IF YOU’RE USING JERSEY FABRIC LIKE ME — get enough fabric to allow for about a foot and a half of shrinkage per curtain panel. More on that later in this post…

diy shibori tie dye curtains

Cutting it into three even panels did not prove as easy as I thought. We had to move a bunch of furniture and stretch the fabric between two rooms to accurately measure it and cut it into three equal pieces.

diy shibori tie dye curtains

My parents’ dachshund delayed things by using the fabric as a runway.

diy shibori tie dye curtains

Once the fabric was cut, it was time to tie! I went with the accordian fold method. My sister and I each took a side and horizontally folded every six-ish inches.

diy shibori tie dye curtains

I tied twine about two inches in from the edge and wrapped it tightly all the way down the width of the fabric. You might assume, as I did, that the tying is a one-person job. NOPE… My mom held the end we were tying towards down tightly, while I tied, and sis helped me maneuver the tied end of the panel so it would be nice and tight. It was tough, peeps.

diy shibori tie dye curtains

diy shibori tie dye curtains

Now that my 3 panels and my excess piece (which I used for tabs) were tied up nice and tight, it was dye time! Make sure to follow the instructions on your dye explicitly to achieve the best results. I love using Rit Dye bottled liquid dye because the process is quite simple and it produces beautiful color results. BTW this post, like my others, is NOT sponsored. I am merely providing my opinion of the products that I use.

diy shibori tie dye curtains

With Rit, you want to use hot water so the dye will set. I accomplished this by using two stock pots to boil water which I mixed in with a few gallons of water straight from the hose. The water was a good temp to help the dye set, but not so hot that it was dangerous to put my gloved hands in it.

I wanted an indigo look for my curtains so I used an entire bottle of Royal Blue and around four tbsp of Black Rit Dye. This was the easiest part; just pour and stir! Indigo’s not your jam? Never worry, Rit has a ton of color options and even handy tips on mixing to achieve that perfect hue!

diy shibori tie dye curtains

After the dye was all mixed up with the water and one cup of salt, I took a deep breath and dropped my bound fabric in the mixture, and then stirred it around like a witch at a cauldron. Instead of a dowel, I used a metal broom handle to stir, which worked like a charm. During this process, my mom was close by, filling the other bucket with water from the hose, so I had a place to rinse my fabric.

diy shibori tie dye curtains

I let my curtains soak for around eight minutes, then I promptly pulled them out, squeezed out the excess water and rinsed them in my other bucket.

diy shibori tie dye curtains

diy shibori tie dye curtains

Once most of the excess water was out, I cut the twine and un-bunched them. I was straight up giddy about the way they looked!

diy shibori tie dye curtains

diy shibori tie dye curtains

diy shibori tie dye curtains

After they were all un-bound, I thoroughly rinsed them in the water bucket my mom filled for me until the water from the panels ran clear.

I used some of my leftover twine to create a makeshift clothesline and hung the fabric to dry in the hot afternoon sun. I hit the homestretch!

Except, when I held the curtains up to the wall to see how they looked, it occurred to me that they shrunk about a foot and a half. I was soooo sad, friends. This is where buying more than you need comes in. Educate yourself on the shrinkage tendencies of the fabric you plan to use BEFORE you purchase / cut it. In my case, I KNOW jersey shrinks. I was so gung-ho about finally tackling this project that I just didn’t thoroughly think through that part.

Luckily, I was able to stretch my panels back out to their pre-hot-water-and-dye-bath size. More on that in a near-future post. Let us quickly work our way to the reveal, yes?

diy shibori tie dye curtains

I used that extra bit of fabric that I dyed with the panels to sew on some simple foldover tabs. I didn’t hem any edges. I actually rather like the rolled-edge look of jersey fabric.

diy shibori tie dye curtains

diy shibori tie dye curtains

I used a few strips from my excess to create ties to hold the curtains open during the day.  I am big on natural light so these ties were a must!

How great do they look?! They give off a sort of whimsical, relaxed, boheme vibe that I hope I’m cool enough to pull off…

diy shibori tie dye curtains

Who else has tried their hand at shibori? Link to your project in the comments si vous plait!

Adventures in Spraypaint: Sunburst Mirror

In my last living room post, I mentioned that I needed to spray paint the mirror over my fireplace.  I finally got on it  and I’m super happy with the result!

I bought this mirror three years ago, not for it’s weathered oak finish, but for it’s sunburst-y shape.  Sunburst mirrors were mega popular in the decor world that year, and they are in heavy circulation still, as any diligent pinterest user will tell you.

spray painted wood mirror

spray painted wood mirror

I loved the weathered oak, but it didn’t match any of my stuff.  As the old saying goes, life is too short to be irritated by mismatched furniture… That’s how it goes, right?

Taping this bad boy was a bit tedious, but diligently protecting the areas you don’t want to paint is key to a good spray paint job.  I used a plastic putty knife to smooth the tape down into the little crevice between the mirror and wooden frame.  Once I got tape all around the edge of the frame, I also taped newspaper on top of the mirror – no pics of that part, sorry!

spray painted wood sunburst mirror

I used Rustoleum Paint + Primer in gold, and because I didn’t use a white primer underneath, the grey tones of the weathered oak created a kind of champagne color. It turned out so pretty!

spray painted wood sunburst mirror

spray painted wood sunburst mirror

Always follow the manufacturer’s instructions when spray painting.  Here are my tips for a successful spraypaint adventure:

*Wear protection:
I wear gloves, a dust mask and clothes that I would be okay with accidentally staining EVERY TIME I spray paint.
*Protect your work surface:
Always use a drop cloth, and on days with a light breeze, stand up some cardboard or use more drop cloths to protect nearby items from overspray.
*Take it easy:
Use a light trigger finger on that spraypaint can to avoid a gloppy, drippy mess, friend. It should take at least three light coats to get full coverage with spraypaint.
*Move swiftly:
Quick, even strokes (paired with the light trigger finger) make for beautiful coverage and a smooth finish!

Lets compare the before and after again, shall we?

spray painted wood mirror

spray painted wood sunburst mirror

Yay for pretty things!

Next up for this spot is to install a floating shelf mantle – stay tuned!