Category Archives: Home Decor

Perfect Present-ation

‘Tis better to give than receive.  And Christmas is the season for giving.  The holiday itself is definitely not about gifts, and I’ll be the first to say that I really dislike how commercialized Christmas has become.  It’s not about who has the most or who spent the most or what you received.  For some, there is a deeply religious meaning to December 25.  For me, Christmas is about sharing joy with my loved ones and appreciating my blessings.

That being said – I LOVE giving gifts.  Big or small, useful or silly, or even something tasty, seeing someone laugh or smile when I give them something I spent time on or put a lot of thought into is totally my jam.  Call me a people-pleaser, if it pleases you to do so!

The presentation of my gifts is about 75% of the fun to me – no lie.  This gal LOVES to wrap presents.  I like to do a theme with my holiday gifts.  Last year I did silver paper with blue bows and hand stamped tags.  Sadly, I don’t have a picture.  It was before I started this little website.  Now I take pictures of EVERYTHING.  #bloggerlife

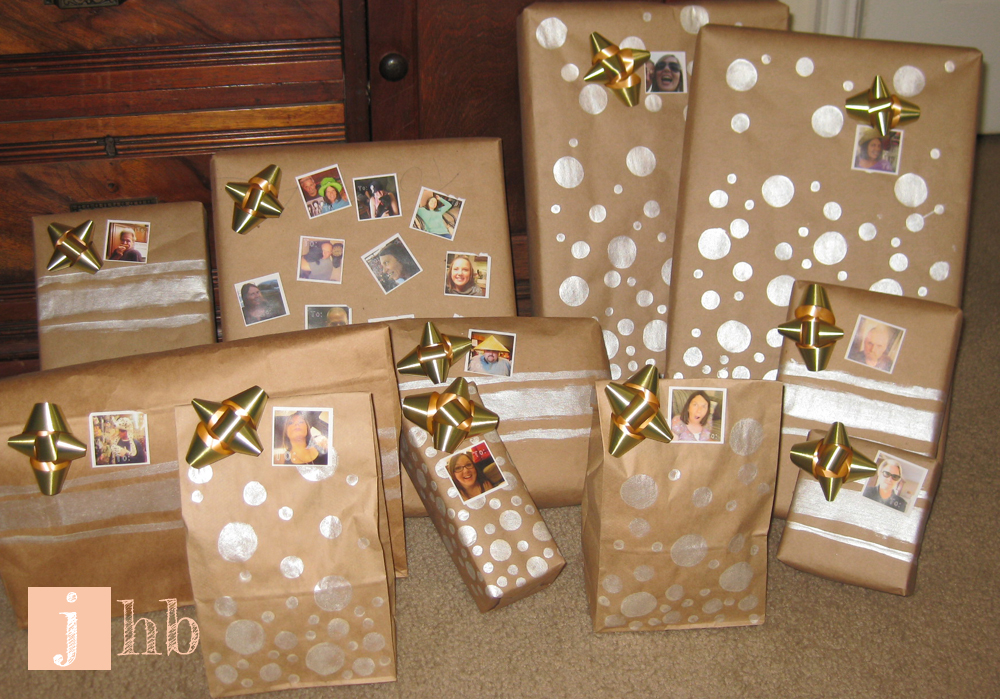
I DO, however have pictures of this years wrapping.  Everyone loves brown paper packages tied up with string painted with bling, right?!

I wrapped almost everything in kraft paper this year.  I ran out and had to improvise with some brown lunch sacks and grocery bags but hey, they matched!

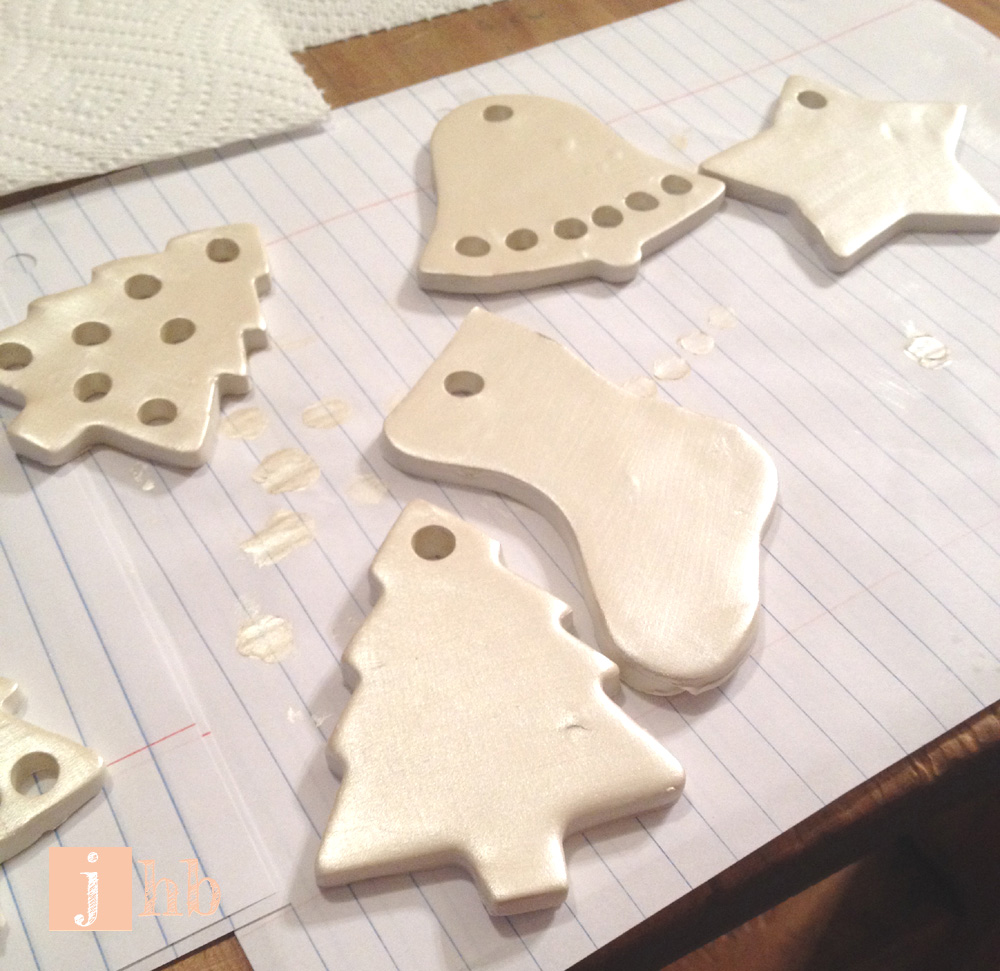
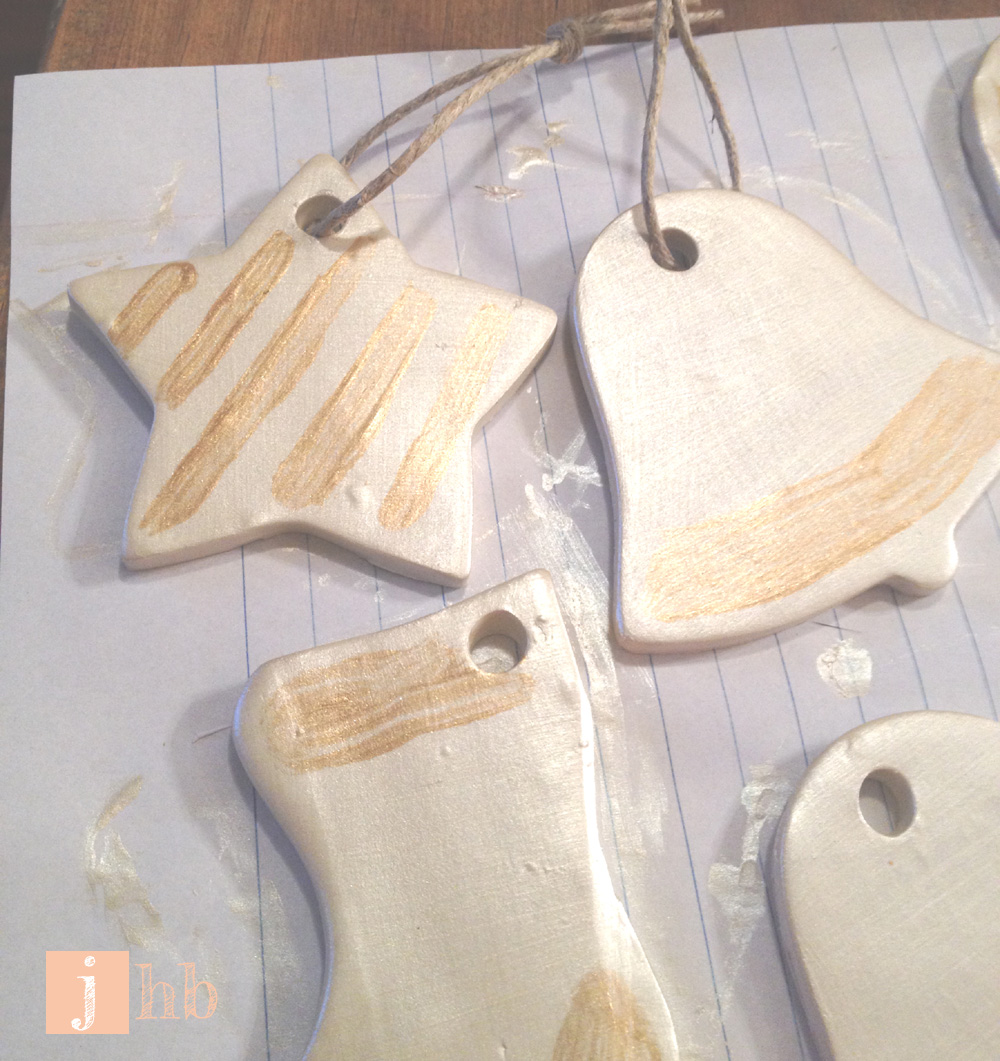
I painted the paper with the same paint that I used on my ornaments.  An acrylic paint aptly titled Champagne.  All the gals got polka dots and the fellas got stripes.

Gifts wrapped in kraft paper and painted

I even home-made my bows with gold ribbon.  They’re perfectly imperfect if you ask me.

Homemade Bows for Presents

I thought about hand-stamping my gift tags again but man – that took FOR.EV.ER. last year.  Then I read this post from Elsie + Emma at A Beautiful Mess.  I’ve been using their ABM app for quite some time (which my instagram followers are well aware of I’m sure).

Photo Gift Tags

Instead of making white spaces to write on like Elsie + Emma, I decided to pick some of my favorite funny pictures of my gift recipients and just put the word “To:” somewhere on the photo using their app.  Once the images were transferred to my computer I put them all in a word doc and printed them out on label paper so I could stick ’em right to the kraft paper.  I can’t wait to watch everyone look through the gifts to find their picture!

DIY Gift Wrap and Tags

I think my crunchy, imperfect little homemade gift wrap theme for this Christmas turned out great!  

DIY Gift Wrap and Gift Tags

Anyone else out there making fancy gift tags or painting on their gift wrap?  What other projects have you been working on for the holiday season?  Do tell…

Icemageddon 2013 and Christmas Spirit

Icemageddon.  That is what the news and social media have taken to calling what the Dallas / Fort Worth area experienced on the 5th of December.  Here in North Texas the temps rarely get cold enough for us to get any kind of decent snow, but every now and again a weather anomaly occurs.  In the case of Icemageddon 2013, we were at 79 degrees on Wednesday the 4th, and by Friday, it looked like this:

Icemageddon 2013

Unfortunately, that is ice, not snow.  Look what it did to our poor pomegranate bush!  Trust me y’all… it’s never looks saggy like this.

Pomegranate Bush Covered In Ice

Folks cleared the shelves at the grocery store in anticipation of the bad weather, which was pretty smart because the roads were incredibly dangerous all weekend.  I was ok with that though, because being “iced in” gave me plenty of time to do Christmas-y stuff!

One of my favorite Christmas activities is baking and decorating sugar cookies!

Five Pounds of Sugar Cookie Dough

Homemade Sugar Cookies

I really need to work on my icing skills, but the cookies taste great, and that’s what matters most, right?

Christmas Sugar Cookies with Royal Icing

Of course the fella requested that I make him a couple of Christmas Ninjas.  The fella has very simple wants.

Ninja Sugar Cookies with Royal Icing

I use this recipe from Bee in our Bonnet.  The recipe makes about 140 cookies when I use my Wilton Christmas cutters, so I have plenty for our families and friends!  And seriously, the royal icing is the best thing EVER.  Any recipe that calls for 2 lbs of powdered sugar is A-OK with me (that would be the royal icing folks).  Tip: I opted to roll my dough out between two pieces of saran wrap, and dipped my cookie cutters in powdered sugar instead of flour.  The flour can dry out the dough and I’ve found that powdered sugar doesn’t have the same drying effect.  If you ever feel like looking at something pretty, check out Bee in our Bonnet‘s website.  Their cookies are so beautiful; they’re little works of art!

I also worked on some Christmas decorating to combat feelings of cabin fever.  We already put up and decorated our tree right after Thanksgiving, details here.

But Icemageddon weekend, I worked on the mantel.  First, I made this little garland with toilet paper and paper towel rolls.  ‘Cause I’m classy like that, feel me?

I painted the rolls gold with my Martha Metallic Glaze in Medallion.

DIY Christmas Garland

Then I cut the rolls into little rings and used some decorative baker’s twine to string the rings together.  I love how simple and cute it is!

DIY Christmas Garland

I used the same glaze on this frame that I scored for $4 at a thrift store ages ago.  I put four coats on top of the white paint that was on the frame and it gives it a brushed brass look.  I love it!

Frame Painted with Gold Glaze

I primed the glass (Zinsser B-I-N of course) and then painted it with Rustoleum Chalkboard Paint in Moonstone.  I used this same chalkboard paint on another project that I’ll be sharing here soon, so stay tuned for that!  Meanwhile, here’s a progress pic of the chalkboard paint on the glass.

Mini Chalkboard DIY

You have to wait three days to condition the chalkboard paint (basically, conditioning is giving it a light all-over coat of chalk by rubbing the side of a piece of chalk across the entire board and then wiping it off so you have a soft, chalky surface to write on). So once I was able to do that, I wrote this festive little message!

DIY Mini Chalkboard

I have it sitting next to the portrait of Turkish that my dad drew and gave to me last Christmas. That picture has lived on the mantel all year and as of now I have no plans to change that. Not to brag but isn’t my Dad so talented?!

Christmas Mantel

I also made what I’m calling a mantel cloth.  It’s like a table cloth for your mantel.  There is probably a really fancy name for it, but that word is not in my vernacular.  And I’m busy writing this post, so I’m not gonna google it, k?

I’ll be honest, our mantel (and really our whole fireplace in general) is not my taste.  At all…  I dream of a day when I can have a natural stone or white brick fireplace…  But since we rent, demo-ing ours and building a new one just isn’t in the cards.  Enter the mantel cloth.  Mantel out of sight, mantel out of mind, that’s what I always say.  I said that once, just now, but anyway…  I just cut up some burlap that I’ve had sitting around forever a while and lightly tacked it to the mantel.  

Burlap Cloth on Fireplace Mantel

IMG_1908

I also painted a little gold line along the points, as you can see two photos up.  It looked much prettier in my head.  But you can hardly see it now so it was really an unnecessary step.

All of these little projects combined with my faux greenery and some battery operated lights made for a pretty cute little mantel, I think!

Christmas Fireplace Mantel

I also whipped up a quick wreath for our door.  I just hung some tiny ornaments on it, tied a bow of red tulle to the bottom and called it a day.  We have a storm door, and our door doesn’t face the street, so I opted to hang it inside instead of outside.  We get more face time with it that way anyway.  If its been made, someone should see it, right?!

Christmas Wreath

Christmas Wreath

I know that countless folks out there were affected by that nasty ol’ Icemageddon… How did you guys spend it? Or were you lucky enough to avoid it? Do tell…

Rockin’ Around the Christmas Tree

That may not be the most original blog post title in the world but I’m ok with that.

All of my blogger friends are showing off their Christmas trees and that’s a bandwagon I’ll happily jump on!  Although I’m pretty late with it… I’ve had my tree up since the 1st!  This blogger has been busy this Christmas season!

This is the first year that the fella and I have had a full size tree.  We  opted for a faux, pre-lit tree because, well, it was free.  It was a hand-me-down from his cousin and we were happy to take it off of his hands.  But we had an issue with the lights.  See I just prefer white lights on my Christmas tree.  And this year, I’m feeling the whole gold, silver, white combo.  This pre-lit tree had bright candy-colored lights zip tied all over it.  The fella, though, he’s such a trooper.  He spent about four hours cutting each and every last zip tie off of those branches for me.

clipping lights from a pre-lit tree

Sorry ladies, he’s taken.  🙂

Turns out, the colored lights didn’t work anymore anyway so it had to be done.  And I’m really glad my fella spent all that time doing it!  I owe him big time.

Now, since we haven’t had a large tree before, we were lacking in the ornament department.  I was going to make a fancy salt or cornstarch dough a la Pinterest, until I found a big ol’ brick of clay in my craft stash.  Good enough for me!

Sculpey Clay

I just rolled it out and used my Wilton Christmas cookie cutter set to make some fun, festive shapes.

Ornaments Made From Clay

I used a drinking straw to poke holes in them for string (plus some extra holes for fun), and then baked them according to the instructions on the package of clay.  Notice the fella threw in a ninja or two that he made with our Ninja Bread Men cookie cutters….

Baking Clay Ornaments

When they cooled they were ready for a coat of a pretty pearlescent acrylic paint.  The color I used is called champagne and I love it for that.

Ornaments Painted Champagne

Some of them got a little “bling” in the form of my Martha Stewart glaze in Medallion.  Then I tied on some twine and these babies were ready to go!

DIY Painted Ornaments

I also hung some charcoal and silver orbs and of course our special ornaments.  The special ones are those with sentimental value, like the ones the fella and I picked up on our last two trips to New Mexico.  This is the one we snagged this year!

Ornament from New Mexico

I think that state is quite possibly my second favorite in the US, behind the great Lone Star State, which I call home.

My homemade ornaments are a bit more kitschy than I prefer, but I like them all the same.  And I love our first full size faux tree.  I illustrated our tree adventure in this Flipagram which is soundtracked by the always fabulous She & Him.  I seriously LOVE that app.  This is the best picture I could get of the tree, since its in a corner of our living room that gets zero natural light.  I like how it turned out though.  Needs ribbon and a topper, but I seriously haven’t even had time for it!

jhb Christmas Tree

I’ve been working on all kinds of Holiday projects around here, and I hope to post about them this week!  I’ve been crazy busy preparing gifts around here!

Anyone else get stuck de-lighting a pre-lit tree this year?  The fella would love to know that he’s not the only one who had to suffer.  Do tell…

How to Hang Curtains Like MacGyver

UPDATE: Welcome to jhb!  Thanks so much for stopping by!  This method worked really well for hanging curtains in my rental without damaging the walls.  If you want to see how the removal went, click HERE!  If you’re installing your curtains, read on for instructions friend!

First, chew a piece of gum.  While chewing, use duct tape to fashion floor length curtains.  Find a piece of plumbing pipe longer than the width of your window.  Affix your duct tape curtain to the plumbing pipe using more duct tape.  Spit out your gum, tear it in half, put some on each end of the plumbing pipe and attach it to the wall.  Boom.  That’s how MacGyver would hang curtains in my situation.  See, the condo that the fella and I live in was built in 1983.  And like most condos built in the early 80s, we have… a mirrored wall.  Here it is in all its glaring, shiny, mirrored glory.  Note that this photo was taken previous to me purchasing my sectional and also previous to the last two living room rearrangements.

Mirrored Wall in Condo

One of the two small windows in our living room is surrounded by this massive mirror.  Into which I cannot drill holes for window treatments.  Convenient.  Our landlord is a saint, but I’m pretty sure taking a sledgehammer to the mirrored wall would be on his no-no list.  Plus, who needs all that bad luck, anyway?  So my task was to figure out how to hang curtains on a wall I couldn’t drill into.  And though MacGyver’s version sounds lovely, I’m not sure it would match our decor.  So here’s how I did it…

*Disclaimer: as with the rest of my posts, this post is NOT sponsored.  I just want to write about products that I love, use and have success with!

My curtain rods, mounting hardware and finials all came from IKEA.  For each window – one rod, a pair of mounting brackets and the finials came to the grand total of $7.47 pre-tax.  So for both windows, I spent $16.17.  Can’t beat it!  And how cute are these finials?!

IKEA finial

Here’s where it got real complicated for me.  I went out and got the 3M Command hanging strips that hold up to 16 lbs.  The ones that work like velcro.  These guys.

Command Strips

I’ve used them before on heavy frames and they work wonders.  I attached the strips to the brackets and the wall according to the instructions, then I waited two days before touching them to let the adhesive set.  I put my curtains on my rods and then carefully rested the rods in the brackets.  And 15 minutes later, the strips separated and the whole thing came crashing to the floor.  Sad face.  My curtains are a really breezy, thin linen, so I really don’t think they weigh 16 lbs (even combined with the rod and finials), but I guess gravity got the better of the Command strips because down they came.

I knew there had to be another way… Enter Alene’s turbo tacky glue…

Alene's Turbo Tacky Glue

I thought it might have enough strength to keep the strips from separating, but also be pliable enough to make removal easier.  I figure if its a little stubborn when I take them down, I can take a box cutter to the tacky glue.  The strips are destroyed when you remove them anyway.

So all it took was a little bead of tacky glue down the length of the strip and a firm press into the wall.

Bead of Glue

I waited a couple of days before putting the curtain rod on the brackets, just to be sure that the tacky glue had set and was completely dry.  I very gingerly put the curtain rods into the brackets and much to my excitement, they stayed up!

Curtains Hung with Command Strips

Imagine me doing a happy dance in my living room while the dog tries his best not to feel embarrassed of me.

Turkish Embarrassed

So far its been a month and I haven’t had any issues with the system not staying put.  I’ll definitely post an update if that changes.  But I’m glad that its a success thus far!  Now I’m thinking I may want to dye my curtains or otherwise give them some sort of upgrade.  Right now they’re just plain linen but I’d love to give ’em some character.  Commencing brainstorm session…

Curtains Hung with Command Strips

So that’s how I hung curtains on a wall that cannot be drilled into.  Pretty great, right?  Anyone else have a creative way to hang curtains without drilling holes?  I’d love to hear other folks’ ideas or workarounds for a situation like this!  Do tell…

Fancy File Cabinet

Folks, just about everything at our place gets a paint job if it holds still long enough.  And that includes a dinged up old metal file cabinet!  The fella and I found this baby on Craigslist for a cool $25.  MUCH cheaper than buying brand new.  And of course I gave it a little style and sass with color-blocking!

File Cabinet Before Makeover

The seller actually has a huge warehouse full of school and office surplus in used condition.  There were tons of neat items that filled me with nostalgia and memories, but the only item that was a practical purchase was the file cabinet. We could have used it as is, but I couldn’t stand to look at its sad, drab face. So I gave it a face lift!  Before I started, I put the cabinet on risers, which are actually just leftover table legs from my LACK Hack project…  This way the cabinet wont stick to the trash bag plastic drop cloth once its painted.

IMG_5418

Before painting, I took the hardware off. I’m not an expert in file cabinet assembly, only organizing the files in it. So before I removed the handles, latches and label holders, I used the highly scientific method of taking a picture of the latch mechanism, so I’d know how to put it back on when the time came. I’m a genius.

HON File Cabinet Latch Mechanism

I applied a couple of small strips of Frog Tape over the holes from the hardware to protect the inside of the cabinet from paint drips.  I also covered the lock with Frog Tape to prevent rogue paint swipes from messing it up.  I didn’t want to remove it, for fear I’d mess it up and render it useless.

File Cabinet Painting Precautions

If you’ve read any of my other posts (thanks!) you’ll know that Zinsser B-I-N is my go-to primer. For Pete’s sake, that stuff sticks to air. No kidding. So this file cabinet got a coat of the ol’ B-I-N.

Priming a File Cabinet

And then there was the boring wait for the primer to dry. I have this habit of adding more dry time to whatever the manufacturer’s instructions state. I live in North Texas and the humidity here is pretty much a year-round thing. Better safe than sorry I say.

After the longer than usual wait is the fun part… Painting! This file cabinet sits in our guest room / office. It lives with a gold shelf (can’t wait to share that project on here) a white writing desk and a guest bed with green and white bedding. The room is no where near where I want it to be. Baby steps. But I am a tiny bit closer with this little project!  I’ll pause while you enjoy the schematic I sent to the fella to give him an idea of what I wanted the cabinet to look like.

Schematic for File Cabinet Makeover

To achieve the diagonal line, I used a yardstick and pencil to trace a line from the top right-hand corner to the bottom left-hand corner.

IMG_5434

The paint I used was some that I actually already had on hand. It was part of the Lowe’s Color Studio 2013 Spring Palette.

Valspar Polar White and Sweet Mint

Polar White / Sweet Mint

I just happened to be at Lowe’s shortly after they were released and bought samples of a few of the colors. Same thing happened when the 2013 Summer Palette came out… I can’t help it! The samples are inexpensive and go such a long way!

So the “bottom half” got two coats of Polar White, then I taped over my pencil line, and the “top half” got two coats of Sweet Mint.  There were about 24 hours worth of dry time between each coat, since this was done on weeknights after work.

Progress on Painting a File Cabinet

And what about the hardware? Well they got the gold spray paint treatment!  No progress pics of that but the gist is that I cleaned ’em, spray primed ’em and gave ’em several light coats of gold spray paint.  I gave the whole thing two coats of polyurethane (I use Minwax) and let it dry for… You guessed it… a couple of days longer than the manufacturer’s instructions suggested. Then I popped the hardware back in (thanks to my handy photo that showed me how to reconnect the drawer latches).

Voila! A pretty, pretty color-blocked file cabinet!!

File Cabinet Redo After

I thought the fella would hate it, I mean it is a bit feminine, but I think he’s just happy to have a place to organize his paperwork (those Air Force guys, they have a LOT of paperwork).  I love how pretty it turned out.  And I still have about half of each paint sample left over for future projects!  I’m tellin’ ya, those things go a LONG WAY.  Here’s a side by side so you can see how glorious it looks after a little TLC.

Before and After File Cabinet

I’ll admit, I’m a bit nervous about the paint chipping, since the metal surface of the cabinet is zero percent porous, but I have faith that my trusty B-I-N is up to the challenge of keeping the paint in place. I’ll definitely post an update if the paint starts to come up.

In the meantime – anyone else taking steps to a more organized life or visiting giant warehouses full of cafeteria tables and science lab equipment? Do tell…