Category Archives: Home Decor

Easy, Inexpensive Mini Succulent Garden

Are you wondering how to make a cute little succulent garden for less than ten bones?  If your answer is yes (and it should be), you’re in the right place, friend.  Don’t get too comfortable – this project was so easy, that I did it in less than ten minutes!  So let’s call this the 10 Minute 10 Dollar Succulent Spectacular, shall we?  I’m glad you agree…

Easy DIY Succulent Garden

Three of these succulents were freebies from work.  Because sometimes my employer hands out succulents, I guess.  I didn’t ask too many questions.

Easy DIY Succulent Garden

The fourth is one that I picked out at Home Depot.  Yes, I purchased the one that looks like brains.  It was $2.50 and I’m in love with it.  Don’t judge.  Here’s a fun macro iPic of him.

Easy DIY Succulent Planter

This glass dish was a Goodwill find.  It looks like it may have been an ashtray, or maybe a candy dish, in it’s previous life.  But it’s low center of gravity, diameter and $1.37 + tax price made it the perfect place for my cute little plants to live.

Easy DIY Succulent Garden

I put some glass beads ($1 at the dollar store) in the bottom to allow for drainage.  Succulents and cacti like drainage.  They hold a lot of water in their leaves and stems, so they don’t need their soil to be so moist.  And you don’t need to water them that often, either.  Which means they’re the perfect plant for me.  My thumb isn’t the greenest.

Easy DIY Succulent Garden

After the beads, I threw in a layer of soil for good measure.

Easy DIY Succulent Garden

Easy DIY Succulent Garden

Then I positioned the succulents in a way that I liked, and filled the gaps with cacti soil.  I used this and it cost me $4.54 + tax.

My workspace got a little messy, but that’s ok.  I was playing with dirt for pete’s sake!

Easy DIY Succulent Garden

Then they got a few splashes of water.  And that’s it, folks!  Lets recap, shall we?

  • Brainy Succulent – $2.50 + tax ($2.71)
  • Other Succulents – free
  • Glass Dish – $1.37 + tax ($1.48)
  • Glass Beads – $1.00 + tax ($1.09)
  • Cacti Soil – $4.54 + tax ($4.91)
  • Total – $10.19 !!!

Ok so it wasn’t exactly $10 but pretty dern close, huh?  Not a bad price for this little guy:

Easy DIY Succulent Planter

He lives at my desk at work.  I’m thinking that will be temporary, since I get zero sun in my cubicle.  Boo.  Then again, I could get a cute little task lamp with a UV plant light to fix that.  Who knows.  I just hope I don’t kill the poor thing.  For funsies, here’s a pic of him that I took with my iPhone fisheye lens attachment:

Easy DIY Succulent Planter

Anyone else doing any gardening at their desk?  Or maybe you’re brave enough to fare the crummy weather that most of the country is experiencing and you’re gardening outside?  Do tell…

Craigslist Catch: Mid-Century Dining Set

So I’ve been really busy the last couple of weeks between my 9-5 and home projects… I’ve got a really fun DIY to share with y’all soon!  In the interim, I thought I’d show off another of my Craigslist Catches.

I’ve posted about a couple of my gems from Mr Craig’s list, like my mid-century style dresser

Mid Century Modern Dresser

…and the file cabinet that I painted.

File Cabinet Redo After

This find, I am particularly obsessed with proud of. Check out our dining set:

Mid Century Dining Table and Chairs Found on Craigslist

In reality, it’s those sexy cantilever chairs that tugged my heart strings.  Note: we have clearly added a jute rug and rearranged the living area since I snapped the above iPhone pic.

Mid Century Wooden Cantilever Chair Found on Craigslist

The table itself is your standard rectangular dining table. The supports for the leaf somehow became damaged so the previous owner bolted it together underneath, meaning it doesn’t expand any more. But I doubt it would fit in our dining area if it were any longer than it is.

Back to the chairs. These things are in about as good of condition as secondhand furniture comes. There is a bit of paint on one of the chairs but methinks it will be easily removed.  Here is an obligatory detail shot.

Mid Century Wooden Cantilever Chair Found on Craigslist

I’ve spent hours (seriously like 12 total) trying to find information on these chairs online. There isn’t a maker’s mark on any of them. I have only ever found one set exactly like them online, and what I found was an outdated sales listing.  And it only listed them as “mid century style cantilever chairs” which, sadly, was not new information to me.  So these chairs are either extremely rare, or so irrelevant that no one has put anything online about them.

Mid Century Wooden Cantilever Chair Found on Craigslist

But even if that is the case, that’s ok, because I didn’t buy them for the value or their relevance in the design world.  I bought them because the instant I saw them I was in lurrrve.  Are you ready to hear the price?

(drumroll…) $40.  Yep, that’s $8 per piece, folks.  I actually paid $50 for them in the end.  I saw the listing last October (yeah I’m a bit behind sharing this…) when we were in New Mexico on vacation. I offered the seller $10 extra to hold the set for me until we got back to town. Worth. Every. Penny.

The new dining set replaced our old one, a World Market set that we got at a garage sale. It was scraped up, a bit wobbly, and even missing some of the seat slats, so I’m glad to have this sturdy, classy new set in its place!

World Market Folding Table and Chairs

World Market Folding Table and Chairs

I am thinking I’ll refinish the chairs in a slightly darker stain (something in the walnut family), and possibly even paint the table a punchy color, a la this, this and this.  Either way, what we’ve got right now is definitely an upgrade to what we had if you ask me!

Mid Century Dining Table and Chairs Found on Craigslist

Craigslist can really be a great source for secondhand treasures, but it really takes some dedication.  It’s true that I’ve had some great successes with Mr Craig but there have been countless times where my searches have been fruitless.  The key is patience and low expectations, kids!

So, what do you think about this Craigslist Catch?  Love it?  Hate it? Votes on what color I should paint the table?  Do tell…

A Tale of Two Tables

I like to work with what I’ve got.  It’s a budget-friendly way to make fun updates to our home.  And that’s just what I did to two secondhand accent tables!

DIY Accent Table Makeover

Now, the first in this “table tale” actually got it’s original makeover almost a year ago, before I started this little site.  Lucky for you, I have pictures!

What started as a black framed glass-top table (sad)…

Before - Sad Little Glass Top Accent Table

Got a sassy new geometric top thanks to a stencil and spray paint (happy)!

After - Happy Little Glass Top Accent Table

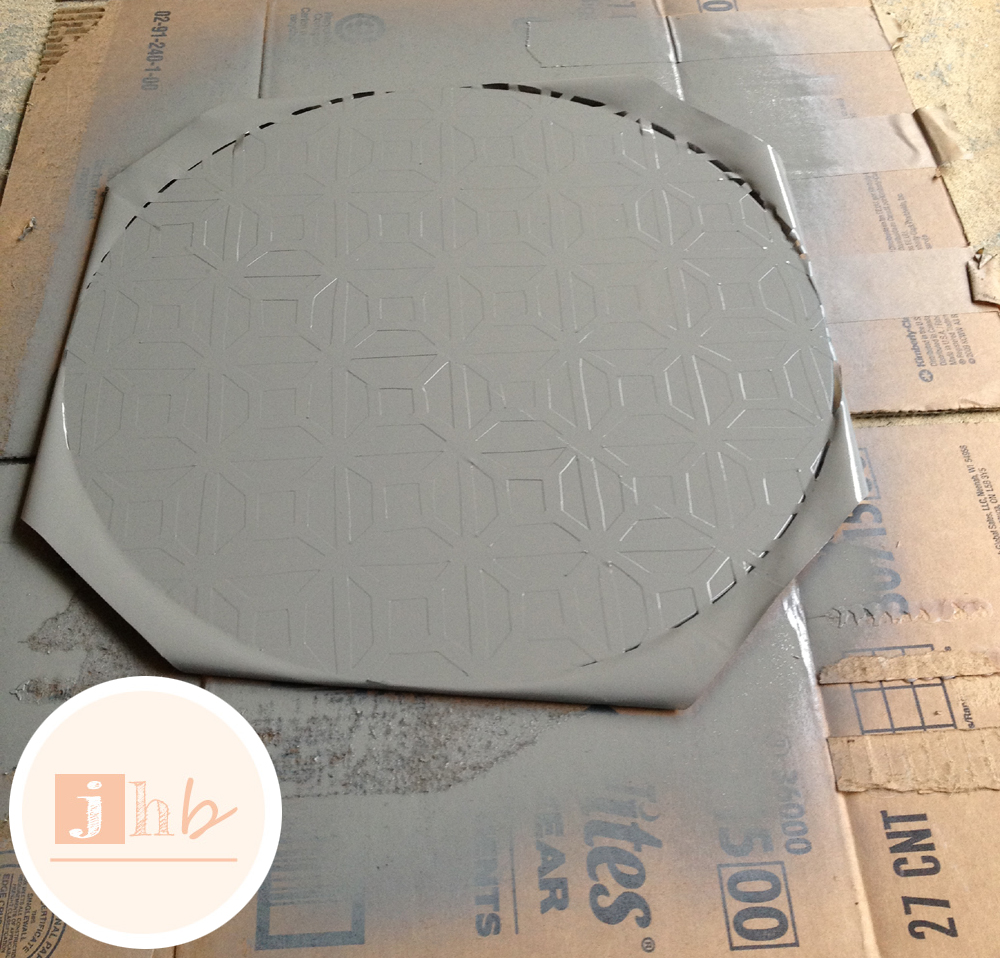
Basically I printed out a geometric pattern that I loved, traced it onto some Martha Stewart stencil film with a permanent marker, used an X-ACTO knife to cut the pattern out of the stencil film (while binge watching HIMYM), and stuck the film to the underside of the glass top so I could paint over the pattern.  Make any sense?  Maybe these pics will help…

DIY Geometric Stenciled Table Top

Tip: I find that using an old gift card to smooth down stick-on stencils really helps to ensure that there aren’t any bubbles and the stencil is firmly in place.

I started with a few light, even coats of gray spray paint…

DIY Geometric Glass Top Table

Then I carefully pulled the stencil off (while the gray was still wet) and gave the entire thing a few light coats of white.  What resulted was a pretty geometric pattern on the underside of the glass!

DIY Geometric Glass Top Table

DIY Geometric Glass Top Table

I couldn’t decide whether I wanted to paint the frame or not, so I resolved to live with it as-is until I could make my mind up.

Fast forward several months later and I am definitely feeling that the black frame is too harsh for our living room and just doesn’t look right.

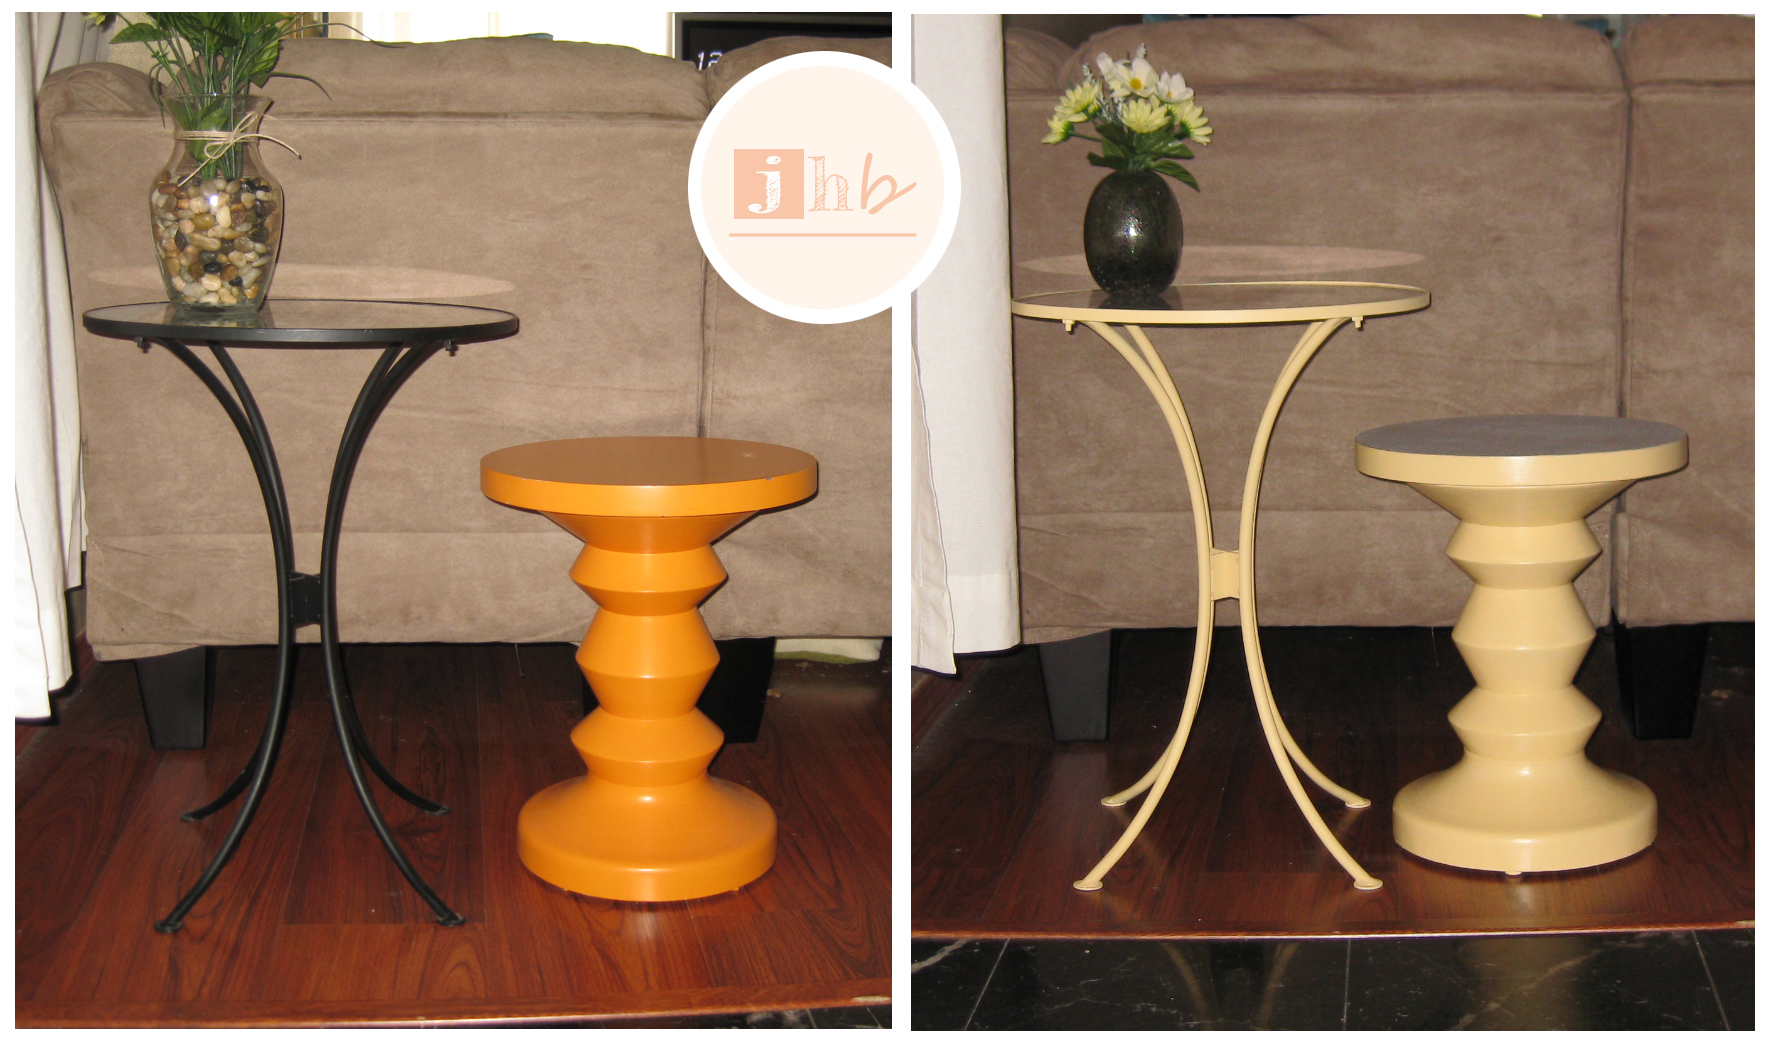
In the meantime, I had acquired the little orange accent table.  I bought it because the price and shape were right, but I wasn’t feeling the color.  I like orange, I just don’t really have a desire for it in my accent tables.  Plus this little guy had some scratches and dents…  Don’t mind that awkward vase – I have no explanation for it.

Before - DIY Matching Accent Tables

With furniture, color is almost never a deal-breaker for me.  Most pieces can be sanded and painted or re-stained, and it’s so fun to customize something to my own taste!

The funny thing is, these tables got together by pure chance.  I never even considered sticking them next to each other until we put up our Christmas tree.  We stuck them by the front door behind the couch to get them out of the way, and that’s when the light bulb went on above the ol’ noggin.

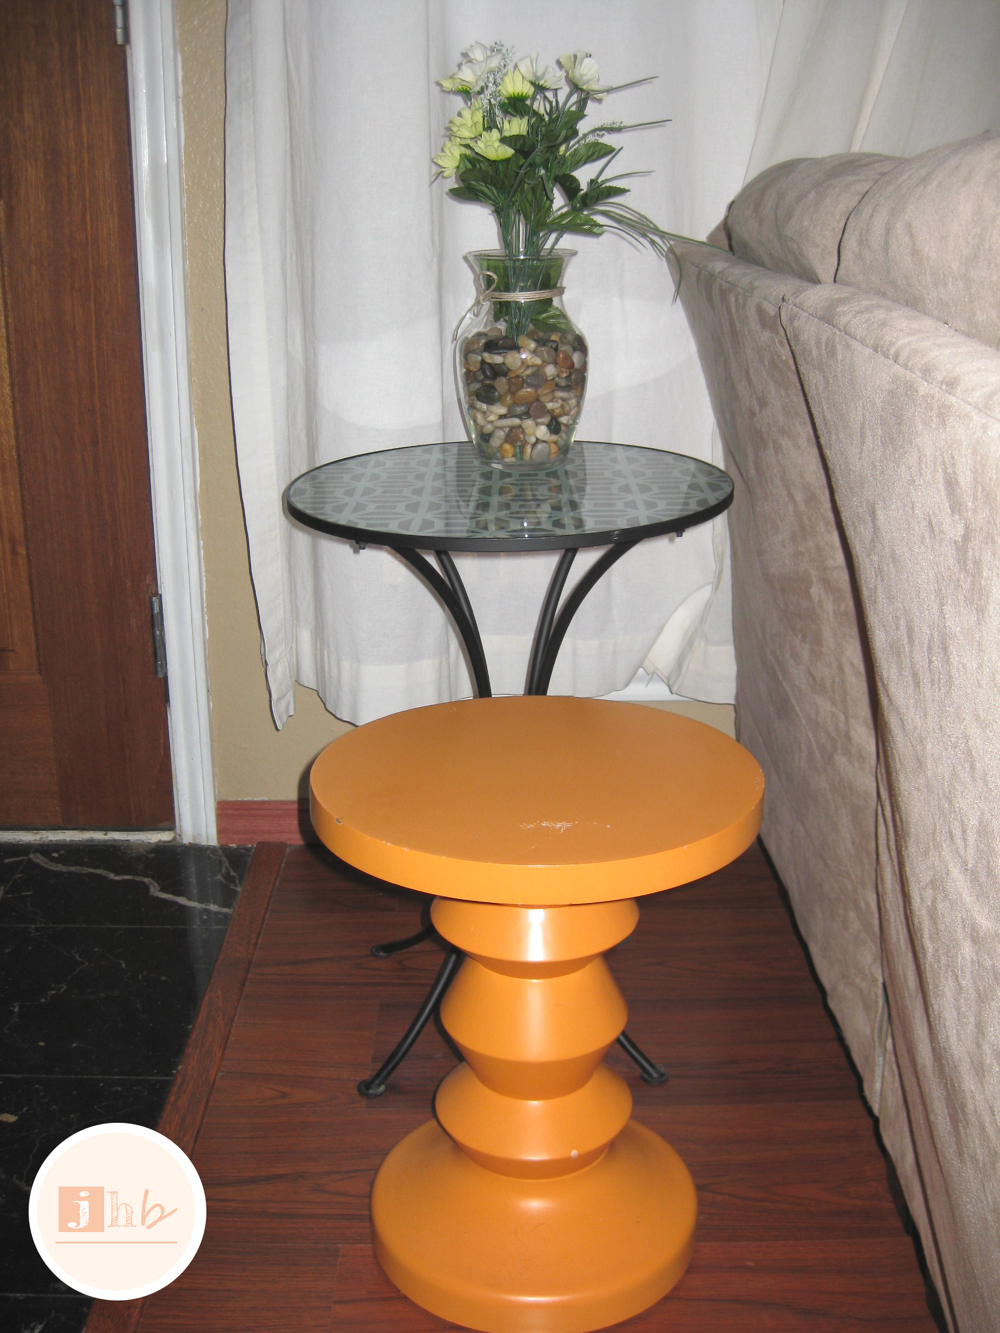
I decided they both wanted to be yellow since we have yellow in other places in the room, and the (formerly) orange table would get a gray top, so it would play well with the gray and white glass top on the other one.

I primed them both with Zinsser B-I-N (my favorite); the black frame with spray and the orange table with liquid.

Primed Metal Accent Table Frame Primed Wooden Accent Table

I’ve mentioned before that I have a weakness for the Lowe’s Color Studio samples, and the paint used for this project was no exception.  They were part of the Lowe’s Color Studio Fall / Winter 2013 pallet.

Valspar Delightful Moon / Cathedral Stone

Delightful Moon / Cathedral Stone

I ended up hand-painting both tables.  I know what you’re thinking – wouldn’t it be easier to spray the metal frame instead of hand paint it?  The answer to your question is absolutely yes it would be easier.  But I couldn’t find a spray paint that I could be certain would match the Delightful Moon, which I was swooning over.  And I’m a bit OCD about things like that.  I needed an exact match.  The black frame took three coats of paint and the orange accent table only needed two.  No progress pics of the black frame, so imagine me laying on my floor with a foam brush in hand carefully and painstakingly painting the thing, k?

DIY Painted Accent Table

Now before I go further I want to take a minor “non”-stance on something – many people cut their latex paint with a thinner (like Floetrol) or use oil based paint / lacquer to minimize brush strokes.  I don’t mind brush strokes on some things, and this table falls into the “some things” category.  The brush strokes are barely even noticeable.  If it were the focal point of the room I may be singing a different tune…  But it isn’t, so I’m not.

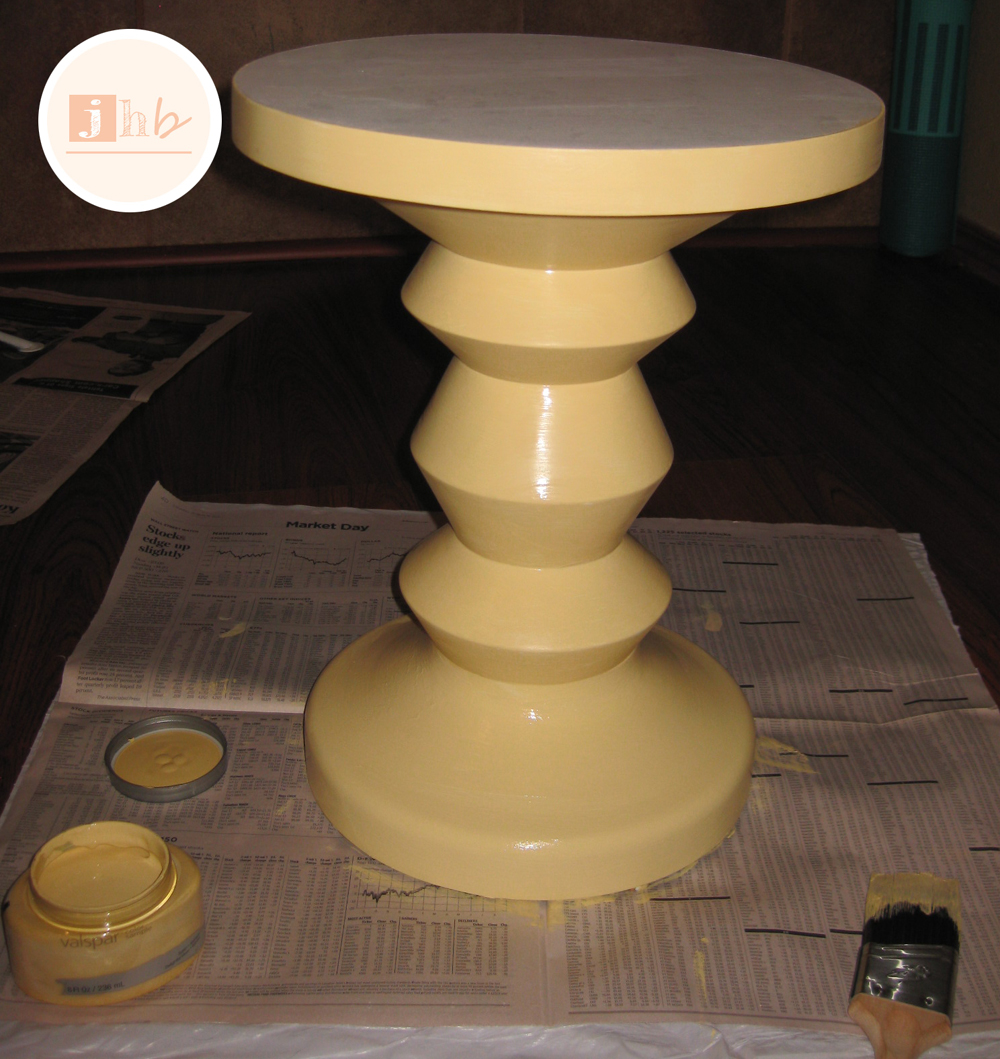
Let me go back a bit, the orange top needed a little pizzazz, since it’s geometric counterpart was so fancy, so I opted to use the same textured wallpaper I used on our media stand, my frame in my cubicle and the frames above our bed (which I’m still not in love with).  I cut the wallpaper to fit the top before I painted the table, and when the table was primed, I soaked it and stuck it to the top.  I waited 24 hours before attempting to paint it, and then this happened:

DIY Accent Table

I must have taken the wallpaper out of the water it was soaking in too early.  I can’t seem to find the instructions, so I suppose I threw them away.  Fail.  But no matter, Mod Podge to the rescue!

I went ahead and painted the base of the table yellow, and then mod podged the wallpaper to the top (I used the gloss finish, because it was what I had on hand and therefore free).  It worked perfectly!

Once the mod podge dried, the top got three coats of Cathedral Stone.  As with many paint jobs, it was looking a bit funky after the first coat.

Accent Table Makeover

But by the third coat it was looking great!  I wish the gray translated better in pictures – it reads really lavender here but its very cool bluish gray in person.

DIY Accent Table Makeover DIY Accent Table Makeover

The tables fit perfectly between the couch and our front door.  I really wish I could put a cute sofa table there, but then the fella and I would be seriously lacking in the walkway department.  These were never intended to be long term pieces, but now that they’ve gotten a face-lift, I may change my mind!  For now, they’re perfect for us to set mail or our keys on when we walk in the door.  How about one last pic before you go?  Here is the final before and after:

Before and After

How do you work with what you’ve got when you decorate or organize?  I do love sharing creative ideas.  Do tell…

That Thing Really Tied The Room Together

If you’re not a Big Lebowski fan, you may not realize that what I’m talking about here is a rug.  But that’s ok.  You don’t need to have seen the movie to understand this post.  I just wanted to drop in and show you guys the new rug I recently bought.

Disclaimer: I was unable to distract the dog or send him elsewhere while taking pics, he makes an appearance several times in this post!

I was on a (fruitless) quest for rain boots the other day when I ran across this baby at – of all places – Ross.

Clearance Rug

Let me tell you, when Ross puts things on clearance, they don’t play around!  The rug cost me a cool $14.99 plus tax!

What is hard to tell until I show you this close up, is that it’s made of denim strips!

Denim Rug

It’s barely noticeable in person, in fact, the fella hasn’t even commented on the fact that it’s denim, so I’m not sure he even knows!  Either way, I absolutely love it!  It really plays well with all of the other blue hues in our living room (i.e. the toss pillows and the media stand).

I’m so glad I found this.  I’ve been eyeing all kinds of rugs online for months but the purchase just hasn’t been in my budget.  Please excuse my coffee table, he’s begging to be sanded and re-stained!

The Rug That Tied the Room Together

Moral of the story: always keep your eyes peeled and an open mind when you’re out and about because you just never know when the decor gods are going to shine upon you!  Here is a little before and after so you can see the difference.  Doesn’t it really tie the room together?

Before and After Rug

I’ll be back soon with more updates to the living room.  Spoiler alert: one of them is that tray on the coffee table!  In the meantime, anyone else out there finding a great deal on something they’ve been price-shopping? Do tell…

Merry Christmas Everyone!

merry-christmas

I want to wish everyone a Merry Christmas and Happy Holidays!  I’ve been a busy blogger making gifts and food and decorations!  I’ll be back with some tutorials soon!  I want to thank everyone who has stopped by to read or follow my posts this year.  You folks are the best gifts of all!

Peace and Love,

jamie