Category Archives: Home Decor

This is Why You Always Clean Your Brushes… Completely

Hey internet.  So… after proclaiming a couple of weeks ago in my blogiversary post that I’d like to be on here more often, I went silent.  There are a host of things happening at “jhbhq” (good and not so good) that have kept me away.

Namely, the feller (my mega-handsome boyfriend, whom I’ve known for around 13 years, and have been dating for almost the last four of those) is on a little overseas visit with the US Air Force.  Over the last couple of weeks, as we prepared for his impending departure, my efforts and attention were focused on enjoying our time together, not my diy and craft projects.  I mean really look at this guy…

Feller

I’ve basically been vacillating between being super proud of my Airman and weeping because I can’t share life’s daily adventures with him.  Luckily for me, my bestest friend won’t be gone very long.  Luckily for you, I am going to do my best not to whine about it.

That being said, I now have amplified free time in the event of his absence, so you may see lots of little crafty crafts on here, along with some larger projects that are both in-progress and in the pipeline.  For now I’m going to pop in really quick to show you how I royally screwed up one of my in-progress projects.

this is why you clean your brushes properly #diyfail

Friends, when you use oil based primer, you have to clean your brushes thoroughly with mineral spirits if you plan on ever being able to successfully use them again.  I do this every time I use oil based anything.  Including the last time I used this brush (a Blue Hawk brush for oil based paint).

this is why you clean your brushes properly #diyfail

But…

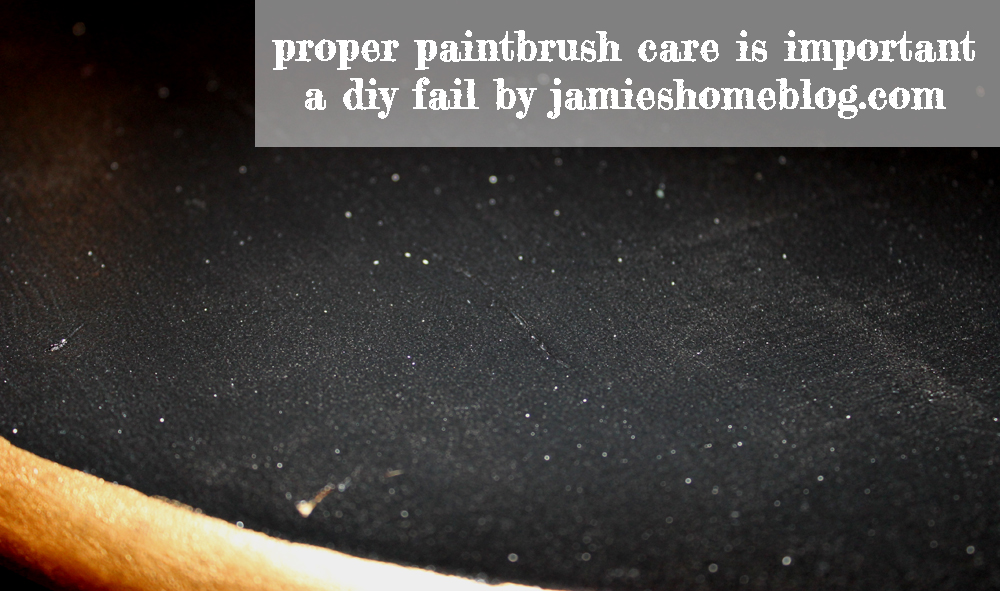
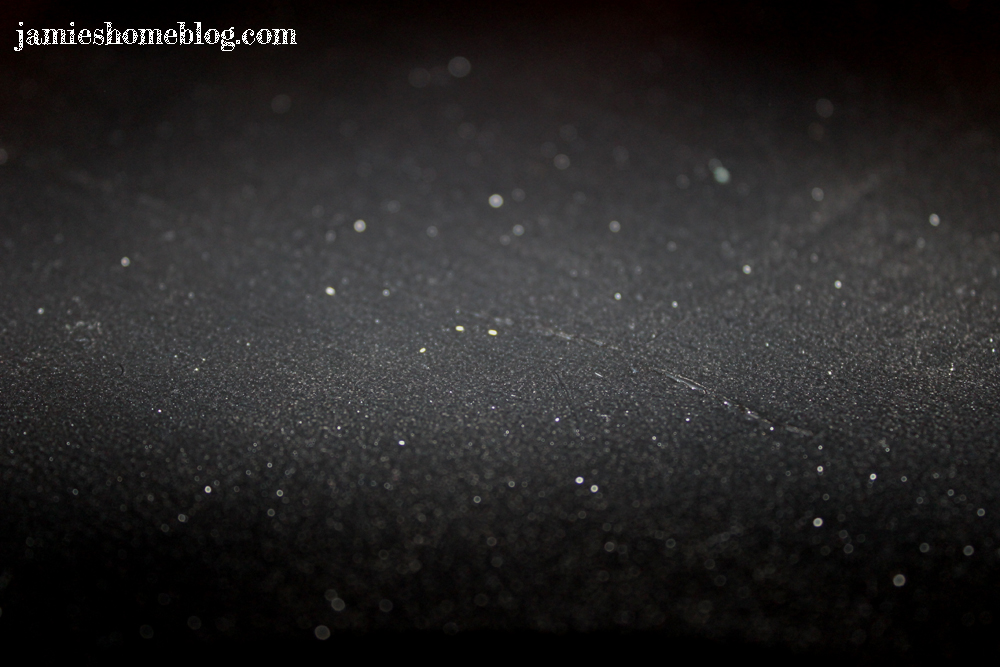
As you can see from the picture, I half-assed it.  Admittedly, when I last cleaned the brush, I was having serious trouble getting all of the primer off (probably because I waited a smidge too long to clean it), and I’d been at it for what felt like a half hour, and it was late at night, and I was hungry, and I had to get up early the next morning for work.

So I said “Self, these last flecks of primer are NOT leaving this brush.  They live with this brush now, and they will do so until the brush dies.  They’re faithful little primer stains that won’t ever come off.  Not even the next time I take out the brush and use it.”

And then yesterday, when I dipped the brush in some polyurethane and brushed it onto this carefully painted black surface, those flecks dropped from that brush like it was their job.  Ahem.  It WAS their job WHEN I WAS CLEANING THE THING!  And now my black surface looks like some sort of janky constellation map.

this is why you clean your brushes properly #diyfail

Now that I’ve spent a day pouting about it, I’m able to share it with the world in hopes that you wont be as lazy as I was the last time I cleaned this thing.  I’m not sure how the heck I’m going to fix my project but I’m going to spend the weekend trying.  Hopefully my next post about this project will be a reveal and not another #diyfail.

Today’s takeaway:  Don’t be lazy, clean your brushes properly, and in a timely manner.  If you have some walking around sense, you’re buying good brushes, and replacing them after each use just isn’t practical.

Have you made a lazy mistake during a craft or diy project?  How did you fix it?  Anyone have any suggestions as to how I should remove white flecks from polyurethane without damaging the black surface beyond repair?  Do tell…

The Red Sticker Rule

Do you like tips for shopping on a budget?  Pull up a chair, friend, cause I have one for you today.

shopping tip - jamie's home blog red sticker rule - target bargain shopping

If you’re anything like me, and maybe a fafillion other people, you might have a weakness when it comes to Target.

Target (who has no clue who I am, and definitely did not sponsor this post) can be really dangerous for folks on a budget.  They continually step up their home decor game, making a clear effort to provide curated, eclectic assortments with an affordable price tag.  So to keep myself from overspending at my beloved bullseye, I created the Red Sticker Rule.

The concept is simple but the execution is a challenge.  Essentially, when I go to Target, I only allow myself to purchase clearanced items, which all don a red sticker.  Sometimes I transgress, but mostly I have a pretty high success rate.  Here are some of the items I’ve gotten on clearance for jaw-dropping prices.

Grey ceramic catch-all bowl – $8.94 on clearance at Target

shopping tip - jamie's home blog red sticker rule - target bargain shopping

Large fabric bin – $4.48 on clearance at Target

shopping tip - jamie's home blog red sticker rule - target bargain shopping

Nate Berkus navy faux snakeskin 5 x 7 frame – $4.98 on clearance at Target

shopping tip - jamie's home blog red sticker rule - target bargain shopping

Plain wood woven basket (I bought two!) – $4.94 on clearance at Target

shopping tip - jamie's home blog red sticker rule - target bargain shopping

Pewter textured square Threshold frame – $9.98 on clearance at Target

shopping tip - jamie's home blog red sticker rule - target bargain shopping

Melamine faux bois candle plates – large $7.94 and small $3.94 on clearance at Target

shopping tip - jamie's home blog red sticker rule - target bargain shopping

Nate Berkus desk drawer organizer – $4.98 on clearance at Target

shopping tip - jamie's home blog red sticker rule - target bargain shopping

Great finds, right?  And those are just the ones I kept track of for this post!  So next time you’re at Target (or any other store you love that your budget hates) challenge yourself to follow my Red Sticker Rule… And do let me know how it turns out!

What tactics do you employ to keep from blowing your budget?  Do tell…

Art is Everywhere

Friends, I hope you all had a wonderful Easter weekend.  If Easter isn’t your thing, I still hope your weekend rocked.  If you follow me on Instagram, you may have seen that the fam and I enjoyed a decadent brunch this Sunday, including Quiche Lorraine, Honey Baked Ham, Fruit, Mimosas, loaded potatoes and my favorite thing to make, bacon wrapped cinnamon rolls!

Brunch

Because my mom is the coolest lady you’ve ever heard of, she still gives my sister and I (and even our boyfriends) Easter baskets full of treats.  It’s not like we’re in our late twenties or anything… Lies, we are.  One of my treats this year was a little 5″ x 7″ Peter Rabbit puzzle called Scarecrow.  The fella and I put it together last night while pigging out on chocolate bunnies and skittles.  I was smitten y’all.

how to preserve a puzzle to use it as art

I laid three coats of Antique Matte Mod Podge on that baby and let it dry overnight.

how to preserve a puzzle to use it as art

This particular type of Mod Podge has an ever-so-slight tan-ish tint to it, giving an antique look to whichever surface it’s applied.  The image already has that kind of look to it so I didn’t actually need to use the antique matte but it was the only Mod Podge I had on hand.

how to preserve a puzzle to use it as art

I popped my ‘podged puzzle into this pretty pearl picture frame.  (What is my deal with alliteration lately?)

how to preserve a puzzle to use it as art

The frame was one of my many clearance Target purchases – $4.94 check and yes please.

As the title of this post points out, art is everywhere.  Even in a “gag gift” (her words) your mom the Easter Bunny stuffed into your Easter basket.  I love the simple, quaint feel of the picture.  Props to Beatrix Potter for creating such sweet imagery.  I don’t have kiddos but I think it would be perfect in a nursery!

how to preserve a puzzle to use it as art

Have you ever preserved a puzzle to use as artwork?  Do tell…

Pink, Painterly and Polished

Pink, Painterly and Polished.  The three Ps.  Yes, the three Ps.  Oh, that’s not a thing?  Ok well look here, friend: If you have ten minutes, a vase and some nail polish you’re 100% qualified to take on this little DIY.

easy diy painterly vase

Look in your nail polish stash and pick a few colors that you like or that look good together, or preferably they meet both of those standards.

easy diy painterly vase

Grab that sad dollar store vase that’s been giving you buyer’s remorse (yes, even for a dollar) for months now and give it a wipe-down.  I used rubbing alcohol on a paper towel to remove all of the fingerprints and months worth light dust the vase collected.

easy diy painterly vase

Start with your lightest nail color and throw some random swipes on your vase.  Let dry for a minute or so.

easy diy painterly vase

Move on to the second lightest color…

easy diy painterly vase

And so on…

easy diy painterly vase

Ending with the darkest color you chose.

easy diy painterly vase

Let it fully dry for about an hour in a cool-ish area of your house and then fill that beauty with water and your favorite flowers!  Peachy carnations are one of my preferred picks and they perfectly complimented the pinks in my polishes.  Whoa how many Ps was that?

easy diy painterly vase

Has anyone else given a face-lift to a boring dollar store vase?  Or maybe you like to alliterate as much as me?  Do tell…

A First Date With Chalk Paint

I’ve seen almost exactly 257 pins and blog posts about different chalk paints and the various projects that folks do with them.  Last Sunday morning I decided I wanted in on the chalk paint game.  This is how that went…

diy chalk paint stool makeover

If you remember (and thanks if you do), I bought a little sample of chalk paint during my visit to Fort Worth Vintage Market Days.  The brand is Oh Lola! Vintage Paint and the color I got was “Antique Egg Blue”.  I really wanted “Marseille”, a delightfully buttery yellow, but Yadi (the owner) said she sold out of that early.  I wasn’t surprised.  That yellow was hot.

Fort Worth Vintage Market Days

Anyway, when I bought the sample, I was already pretty much set on using it to update this pathetic little stool I had sitting around.

chalk paint stool makeover

You know the one.  Most of us have had or even still have one of these.  That sad little $10 blonde stool sold by that one huge retailer.  I actually got mine from the same warehouse sale where I bought my file cabinet that I painted.  It was maybe two bucks or something.  It seemed to have a checkered past, judging by the nicks and paint spills.

chalk paint stool makeover

Chalk paint was the perfect match for this stool.  If you didn’t already know, you don’t need to prep your surface when using chalk paint.  No sanding, no priming.  Just a wipe down to remove dust and dirt.  Also known as a lazy Sunday project dream.

So I broke out my tiny Blue Hawk brush and got to work.

chalk paint stool makeover

The first coat provided awesome coverage.  It was thick but not gloppy, and a tiny bit went a LONG way.

chalk paint stool makeover chalk paint stool makeover

I went ahead and did a second coat (after an hour long nap) since there were still bits of blonde wood poking through.

chalk paint stool makeover

This next part was a random idea that popped into my head after my nap.  I let the second coat dry for a couple of hours and then broke out my hot glue gun and a ball of polished hemp rope.  I marked the middle of the seat, glued the rope down and started working in a spiral from the center, gluing as I went.

chalk paint stool makeover chalk paint stool makeover

Always be careful with your glue gun, kids.  I’m currently sporting a less than sexy blister on my wrist.  Sometimes my arms get flail-y.

The final step was to pad the feet of the stool.  I was going to use some felt from my craft stash, but since I was already in the rope-spiraling mood, I went ahead and made cute little spiraled hemp foot pads.  I really did that part just for me, unless you want to come over and turn my stool upside down and take a look.  In that case, I did it for us.

chalk paint stool makeover

The stool ended up being a little more “farmhouse” than I expected, which isn’t really my style, but I kind of like it’s simplicity.

chalk paint stool makeover

I’m still not sure whether it has a permanent spot in my home, but I did enjoy making it!  The chalk paint was a lot of fun to use, and I’m excited to have another go at it.  I’ve got more than half of my 8oz sample left (I only needed about 3oz for this project) and I’m sure I’ll find a good use for it.

If you decide to try this yourself, you’ll need less than one ball of polished hemp rope (you can get it pretty much anywhere – even the dreaded W), a glue gun and about 20 glue sticks, chalk paint, a paintbrush and a smidge and half of patience.  Definitely doable for the novice and experienced DIYer alike!

What do you guys think about chalk paint?  Love it, hate it?  Do tell…