Category Archives: Home Decor

Blogiversary: Two Years!

Dudes, I’ve been making things my whole life, and I’ve been writing to you about them for two whole years now. Thousands of people have visited my little corner of the internet from all over the planet. I cannot begin to express my gratitude for this entire experience. It’s one of the most emotionally rewarding hobbies I’ve ever had.

I owe everyone that’s ever visited, commented and shared my posts a thank you and a big bear hug! You guys are awesome!

I’ve got some projects in the works right now, which have been delayed because life happens, but in the meantime… Here are a few of my favorite little projects from the past year.

DIY Hanging Canvas Headboard
String Art
Leaning Instax Picture Display Shelf
Upcycled Colander to Patio Planter 

Cheers!

xo,

J

Two-Tone Storage Crate

I love a quick and easy Sunday afternoon project.  This one was cheap, too, so… Trifecta!!!

Here’s a thing I did to get more organized in my bathroom.  My bathroom is REALLY small, so believe me, I need all of the storage and organization I can get.

two tone bathroom storage crate

I bought two little crates at a thrift store for 25c each.  They were bare wood, and frankly, a little boring.

two tone bathroom storage crate

I took some stain that I had lying around (Varathane American Walnut) and stained the outside.  One coat, no fuss.

two tone bathroom storage crate

Then I used a careful hand and a paint sample that I bought a couple of years ago (Valspar Sweet Mint) to paint the inside. Two coats, minimal fuss.

two tone bathroom storage crate

The dark stain mimics my floors and the light, blue-green paint hue matches one of the colors in my shower curtain.  I love it!

two tone bathroom storage crate 040 done

Side note: I invoked my red sticker rule and bought that Nate Berkus rug at Target for $10.98!  Pretty, pretty.

two tone bathroom storage crate

My little crates are perfect for facewash, lotion, body spray and the like.

I already had all of the supplies for this project, so, it felt “free” to me.  But, you could probably re-create this for less than $20.  All you need is a couple of storage crates, wood stain and paint!

Do you have a cute way of organizing things in your bathroom?  I’d love to see… Link in the comments section!

xo,

J

diy Owl Clock

Happy birthday, sweet baby sister!  Bad big sister alert: your birthday was four months ago.  Sorry, baby sister.  Good big sister alert: I gave you almost exactly what you asked for!

Don’t worry, friends, I actually did give my sister a gift on her birthday.  I didn’t have time (there’s a clock joke) to finish this project for her by her birthday, so I got her a shirt that she wanted to tide her over until her real gift was finished.  She’s extremely patient.

One sunny day last August, my sister called me as I was relaxing by the pool.  She says to me “You need to carve an owl clock for me for my birthday!”. “Ha!”, I exclaimed, “I am not a skilled woodcarver, I will do no such thing!”.  But I tucked the idea into my brain, and after some thought, I came up with this little guy.

diy owl clock

You can apply this procedure to any shape, really.  I’ll tell you how I did it.  You can come up with your own clock design, ok?

All the things

  • Basswood sheet (most craft stores sell them)
  • Clock mechanism and face (also at most craft / hobby stores)
  • Template for clock design
  • X-acto knife
  • Cutting board
  • Acrylic paint
  • Paint brushes (I used foam)
  • Clear sealer
  • Dremel
  • Dremel saw blade
  • Dremel griding kit
  • Drill

Template:  I picked a cute lil owl via google image search (that didn’t seem too detailed or complicated) and printed it out.  Then I used an x-acto knife to cut the excess paper around the owl.

001 - owl template

I traced him on to a sheet of basswood.  It’s a little bit stronger, sturdier and heavier than balsa but still lightweight.

diy owl clock diy owl clock

Delay:  Then my sister came over and I hid all of the evidence of what I was making for her.  It would stay hidden for the next four months.  Between the super cold weather, and working extra long hours at work, I just never found the time (ha!) to finish it… Until last weekend when the temperature jumped to the high 60’s.  Yay for project weather!

Cut It Out:  I clamped the basswood sheet to this ikea bench my really fancy work bench and fitted my dremel with a saw blade.  There are easier ways and better tools to cut shapes out of basswood – I’m certain of it.  But I don’t have those tools, so I worked with what I had.

diy owl clock diy owl clock

The dremel saw blade is NOT for precision cutting.

diy owl clock

But, I knew this going into it, and was ready with my dremel grinding attachments to smooth the edges.

diy owl clock

Smooth It: Basswood sheets generally come pretty smooth, but I did opt to smooth the piece even further with 150 grit sandpaper and then fine steel wool.  The steel wool removes all sanding dust and any remaining microscopic lumps and bumps.  An unnecessary step, maybe, but I think it makes a huge difference.

Drill it:  I drilled a hole in the middle of the owl’s belly so the clock mechanism could be attached after his paint job.  To find the center of his belly, I folded my template in half length-wise, and then folded only his belly width-wise.

diy owl clock

A little tap of a nail to make a mark where I wanted to drill the hole…

diy owl clock

A zap with my 1/4″ drill bit, and bam.  Owl belly button.  Don’t mind how rough he looks, this is his backside, which will be against the wall.  His front side is much smoother.

diy owl clock

I used a 1/4″ drill bit for the hole because that was the size of the hand shaft on the clock mechanism I bought.  If you’re making your own clock, make sure you match the size of your hole to the shaft on your mechanism.  Guys, that last sentence went south really fast…  Anyway…

Paint It:  A few coats of brown for the “feathers”.

diy owl clock

I do not have a precise painting hand for detail work, so I used my x-acto to cut my template and taped it on like a stencil to paint the eyes and belly of the owl.

diy owl clock diy owl clock

Same concept for the eyes.

diy owl clock diy owl clock diy owl clockdiy owl clock

And then I used a q-tip for the whites of the eyes (also for the beak and talons but I guess I don’t have a pic of that part – #blogphotofail)

diy owl clock

Clock It:  Two coats of clear sealer and a clock mechanism later, and… Owl Clock!

diy owl clock

Happy birfday leetle seester.  I hope your owl clock was worth the wait.

seester

So whooooo are you guys diy-ing birthday gifts for?  Sorry, friends, I tried to make it through this post without an owl joke, but, it just didn’t happen.  #bloggerpunprobs

xo

DIY Tabletop Leaning Shelf Photo Display

I’m back in blogland after a bit of a hiatus…  SO. MUCH. YES.

Without getting too detailed I’ll address why, because it makes sense to me to do so, and I’m the one running this show.  Suffice to say the one formerly referred to as “the fella” and I decided to go our separate ways.  The simple facts are that it didn’t work out, and that’s very sad, and we wish each other all the best in life.

Why is that relevant?  Much of my content up until now includes references to him and it’s weird to just stop talking about it and not explain why.

Also, I’m not going to make up a fake story as to why I’m currently staying with my parents (thanks again M and D) because I don’t feel like it.  #keepingitreal

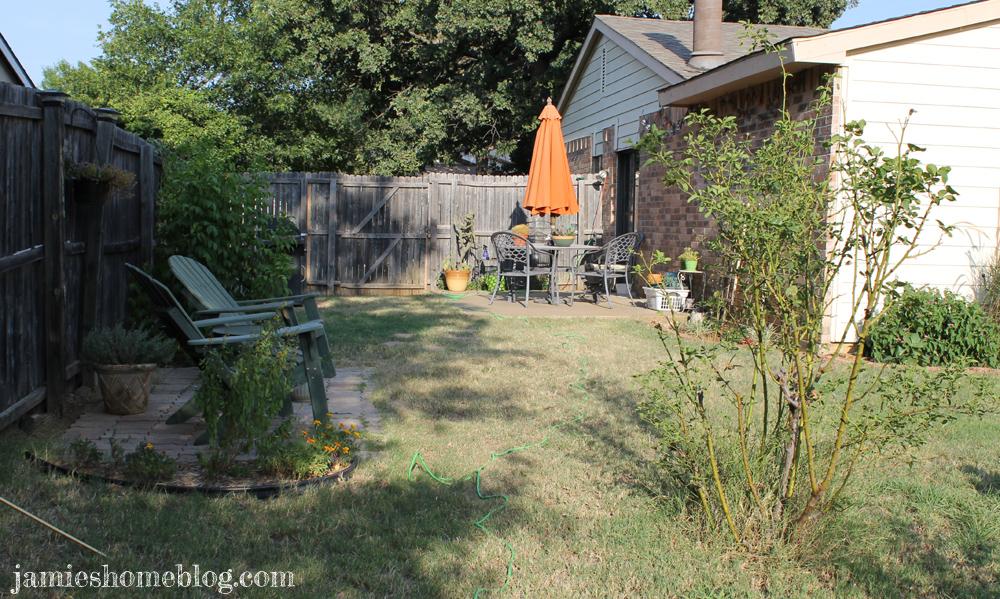
So while I’m on the hunt for a new place, some of my next few posts will probably be set in my parents’ backyard, which has ample space for project execution!  Seriously dudes… This is about 1/5 of their yard…

diy leaning photo display shelf for instax mini 8

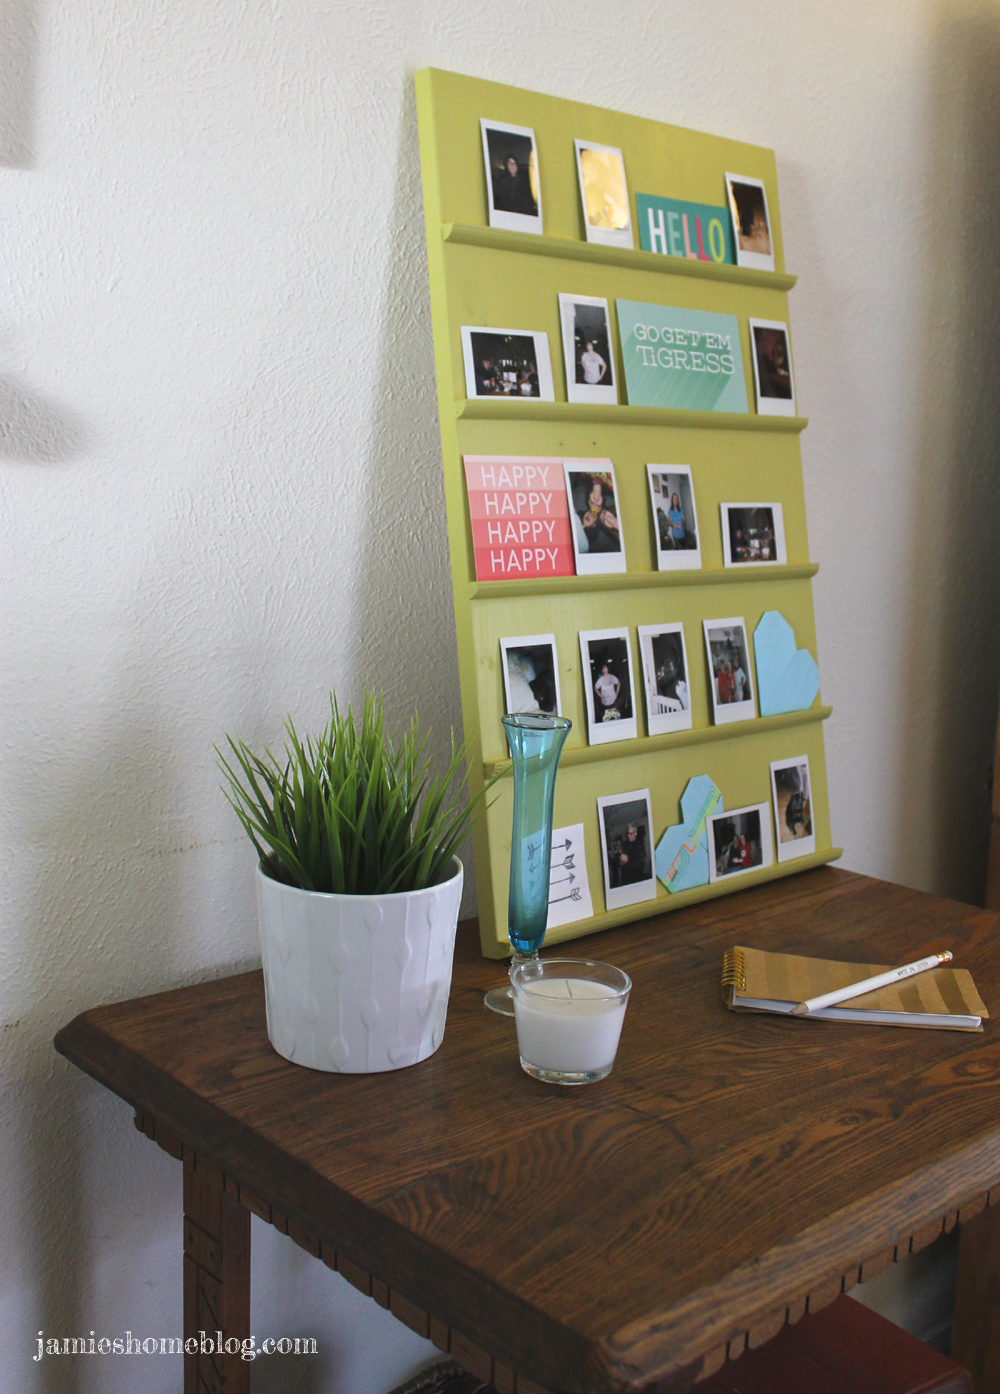
So lets get to it.  One of my favorite toys ever is my Instax Mini 8 camera.  There’s something so magical and special about the fact that each picture I take with this camera is completely unique and can’t be reproduced in the way that digital photography can.  And I totally love watching the photos develop – so much fun!

diy leaning photo display shelf for instax pics

PS this post isn’t sponsored, but if Fujifilm wants to send me some goodies I’ll flip my stance on that quick-style.  Wink wink, nudge nudge.

I’d been displaying most of my instax pics in a clothesline-esque format in my cubicle at work until recently.  ‘Scuse the bad phone pic please.

diy leaning photo display shelf for instax pics

Here’s how I made a super cute display shelf for them…  And how you can, too.

diy leaning photo display shelf for instax pics

Supplies

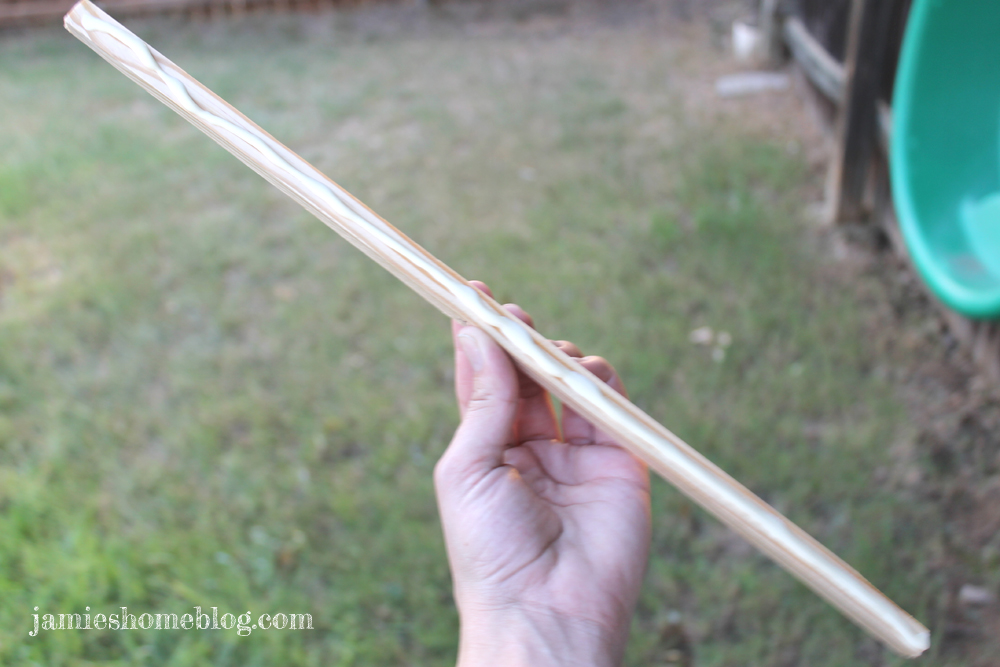
  • 8′ long piece of quarter round
  • 16″ W x 25″ H x .75″ D pine board
  • electric sander
  • hand saw
  • steel wool
  • wood glue
  • clamps
  • paint / paintbrush

Many times when an diy idea – a diydea? – pops into my head, I take to the old school pencil and paper method to really think all of the steps through and make sure my measurements aren’t off.  Real scientific stuff.

diy leaning photo display shelf for instax pics

My shelf didn’t end up being as wide as originally imagined, but I couldn’t find any lumber that was reasonably priced that would work for a 25″ wide board.  I stuck with 25″ high, though, because Instax pictures are 2 1/8″ W x 3 5/16″ H and by placing my 0.5″ quarter round every 5″ on the board I’m left with 4.5″ of shelf space.

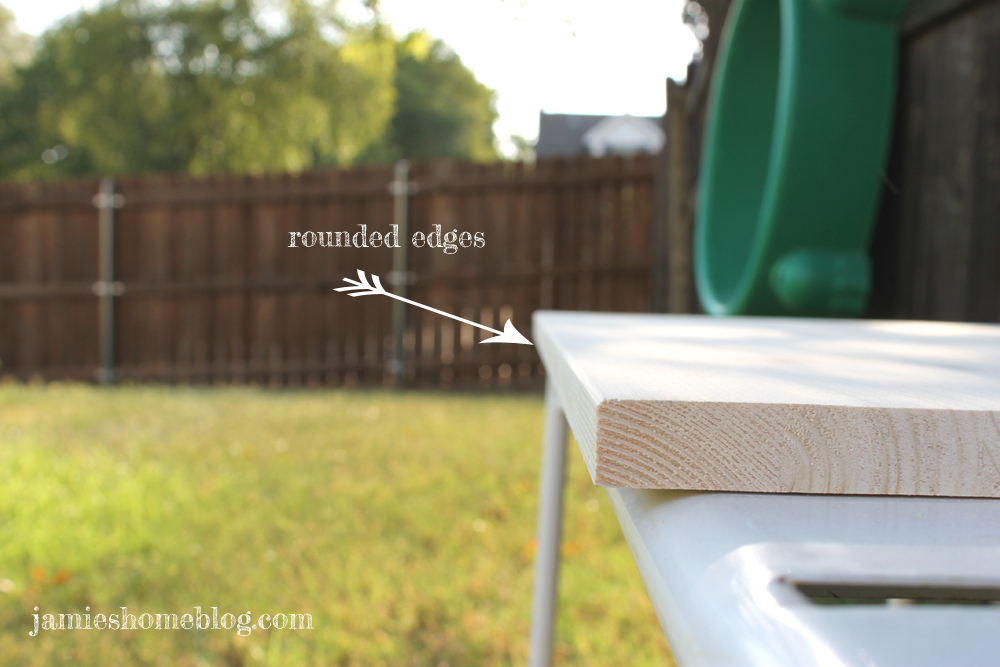
The back board is part of a 0.75″ x 16″ x 36″ Craft Master’s, pre-cut, stain grade project panel.  I’ve used them before on both my bench and my nightstands so I feel like I can vouch for them.  They come in tons of sizes and are good quality.  I had a helpful hardware store guy cut it from 36″to 25″ H and then took it home and gave it a good all-over sanding.

diy leaning photo display shelf for instax mini 8

I also rounded the edges with my sander, and sanded an angle onto the back bottom edge of the board to assist with all the leaning this shelf will do.  It would have been super nice to create this angle with a compound miter saw, but since I do not have one nor do I have access to one, I had to improvise.

diy leaning photo display shelf for instax pics

diy leaning photo display shelf for instax pics

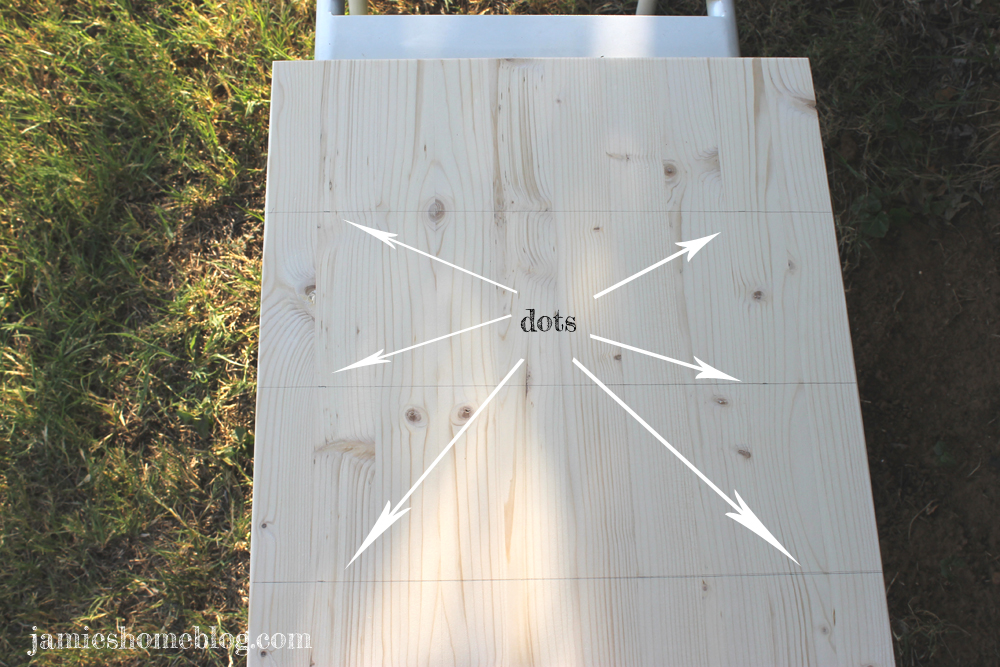
I gave the board one last sanding with steel wool (which leaves a velvety soft finish) and then wiped it down with a damp towel.  Then I marked where I’d put my ledges – every 5″ from the bottom.  The method I used to make sure my ledges were level was to mark little dots on each long side every 5″ inches from the bottom, and then use a yard stick to draw a straight line across, connecting both dots.

diy leaning photo display shelf for instax pics

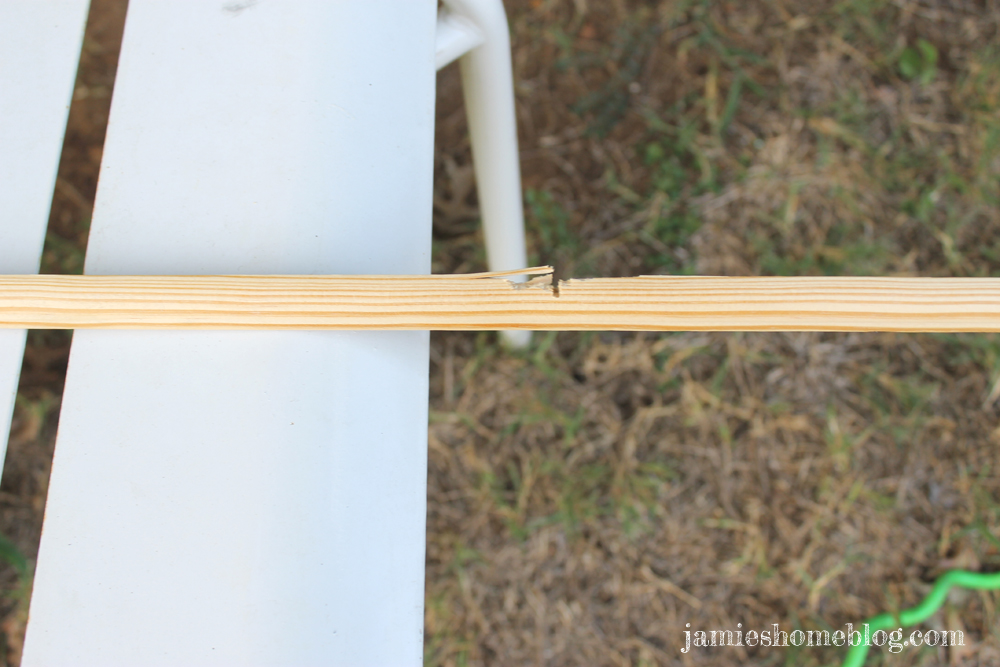
I cut my quarter round using this hand saw

diy leaning photo display shelf for instax pics

After using a reciprocating saw did this

diy leaning photo display shelf for instax pics

Obligatory Interjection from the Safety Police: Do NOT use a reciprocating saw to cut quarter round.  It’s a damn mess.  Also, never use a rusty hand saw.  For anything.  Don’t.  Just because I make a bad decision in diy desperation doesn’t mean you should too.

I used Titebond interior grade wood glue to attach the ledges to the board, clamping the sides as I went along.

diy leaning photo display shelf for instax pics

diy leaning photo display shelf for instax pics

Titebond dries really quickly, but I left the board clamped overnight to be safe.

The quarter round I bought was the straightest piece I could find, but there was still a bit of bowing so I caulked all of the seams to make everything as smooth as possible.

diy leaning photo display shelf for instax pics

diy leaning photo display shelf for instax pics

Then, because the sides of the quarter round were a tad rough, I hit them with the electric sander real quick.

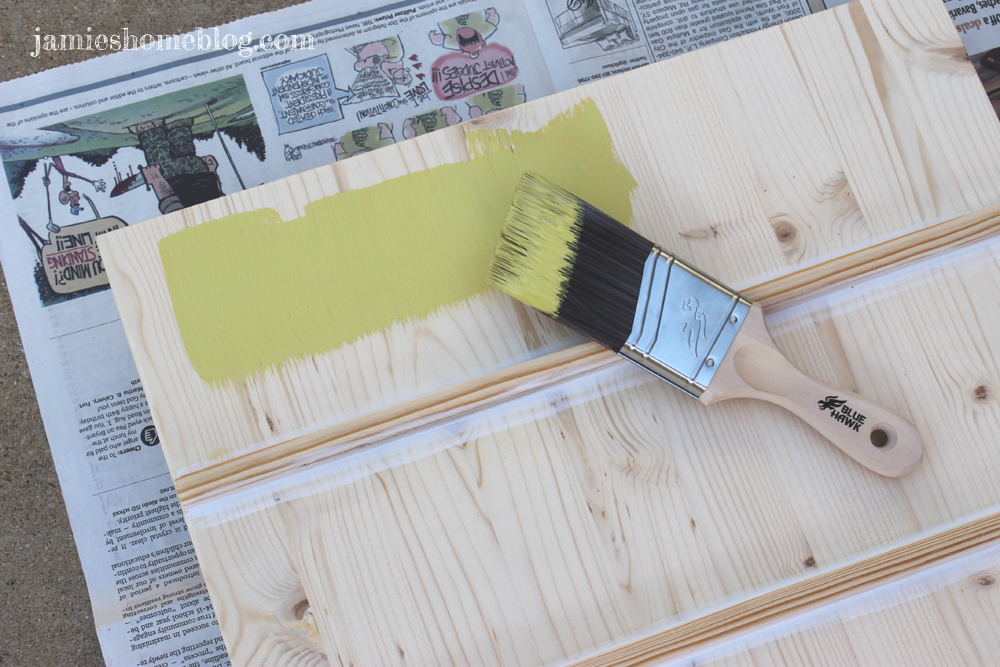
Homestretch – painting!  I didn’t prime this time (hey, that’s a rhyme).  All of my primer is packed in a box and I didn’t want to buy new, or wash my brush multiple times.  And I’m not super upset about the prospect of the wood grain creating a little bit of texture under the paint.  Gotta pick your diy battles, friend.

diy leaning photo display shelf for instax pics

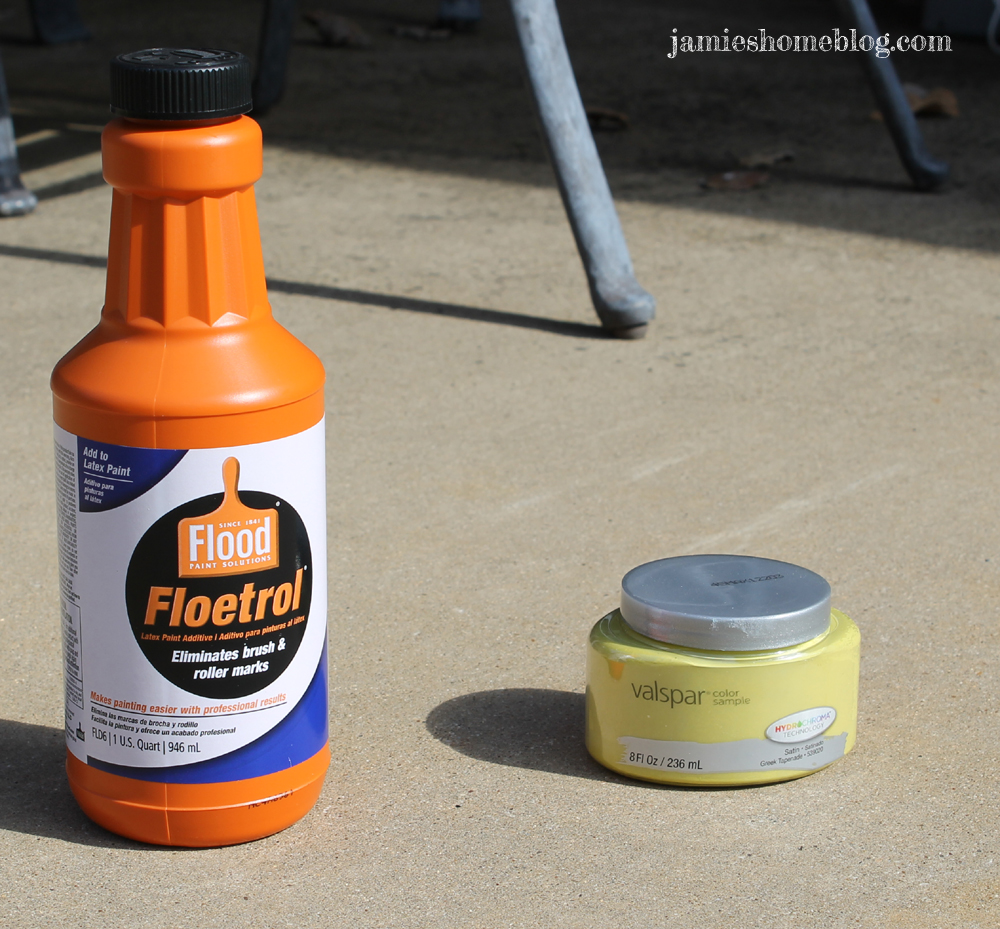
I used a little Valspar sample (Greek Tapenade) laced with a couple of ounces of Floetrol, which reduces brush strokes.  In person this color is like a subdued citrine with hints of avocado.  So. Much. Color. Love…

diy leaning photo display shelf for instax pics

The first coat always looks like hell.

diy leaning photo display shelf for instax pics

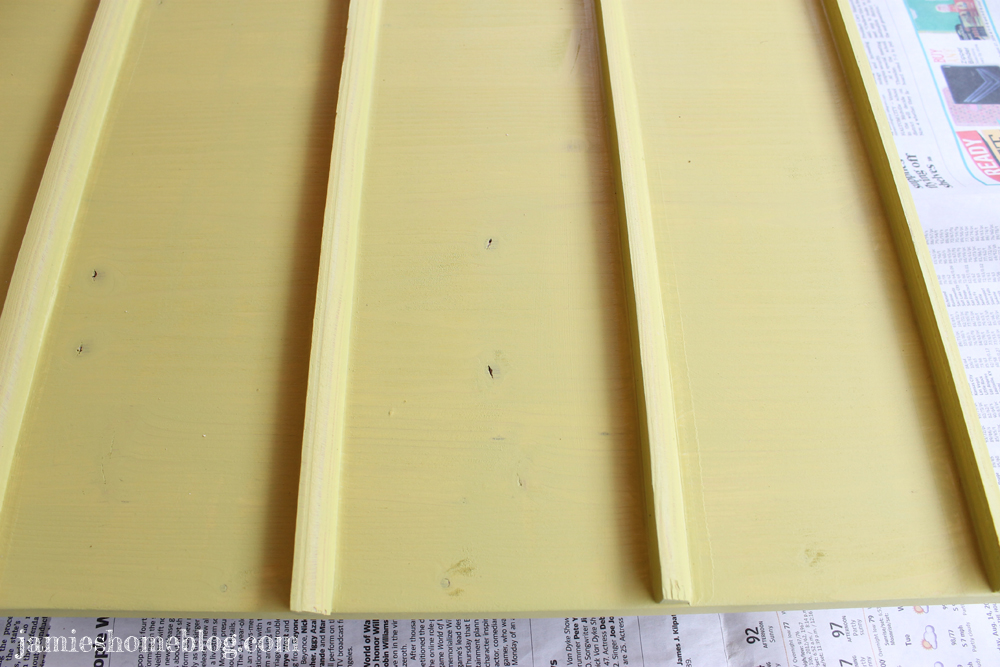
But coat number two looked awesome!

diy leaning photo display shelf for instax pics

It didn’t even need a third coat and because it’s not going to get heavy use, I didn’t feel the need to seal it with anything.  How cute did this thing turn out?!

diy leaning photo display shelf for instax pics

diy leaning photo display shelf for instax pics

I’ll post a pic of it in my cubicle after I get it in to work tomorrow :).

Until next time, friend… Do you have an instax camera?  How do you display your instax pics?  Do tell…

How To Un-MacGyver Your Curtains

taking down curtains put up with 3M command strips

My second-most popular post ever in jhb history was this one where I hung curtains in a creative, albeit rudimentary, sort of way.  I think it’s safe to say that most renters struggle with whether or not to hang curtains, because some landlords are so very strict about damaging their walls (understandably so).  I also faced the challenge of having a window on a mirrored wall (helllooooo 1983), which I was most certainly not willing to drill into.

See me?  Ask me how fun it is to try and take pictures of your living room for your blog with this bad boy getting in the way…

taking down curtains hung up with 3M command strips

Anyway the quick and dirty version of the story is: because the 16 lb weight capacity 3M Command Strips weren’t strong enough to hold up my curtain rods, I decided to run a bead of Turbo Tacky glue down the strips to hold them together.  I then promised to return to you to talk about taking them down.  Here I am.  Feel free to check out the original post for the full rundown of the original installation but be forewarned – I couldn’t find my point-and-shoot so you’re going to be stuck with really bad iPhotos.  Sorry, friend.

Oh and to answer your question: yes it drove me batty to look at highwater curtains for the past year but not as much as it would have to look at those 80’s-Special plastic and pastel fabric vertical blinds.  Pick your battles with your house, people.  Really, I kept meaning to get new curtains but it just didn’t happen, k?

taking down curtains hung up with 3M command strips

The removal was really easy and I’m pretty pleased with myself for coming up with this little idea, although I will say it worked better on the mirrored wall than on the textured painted drywall.

I grabbed my box cutter, put in a brand new mega-sharp blade and very carefully and slowly ran the blade down the length of the dried glue.

taking down curtains hung up with 3M command strips

That left me with this little guy.

taking down curtains hung up with 3M command strips

You can see where the glue was at; I tried to angle the blade in a way that favored the wall to avoid gouging it.  So the line of glue you see is actually both sides of the command strips stuck together, which left a hole in the strip stuck to the bracket.

taking down curtains hung up with 3M command strips

But check it out, guys:

taking down curtains hung up with 3M command strips

Zero wall damage.  And it only took a few minutes.  The white spots you see are leftover adhesive from the Command strips, which rubbed off with a swipe of my finger.  Victory!  Except for with the second bracket, where I slipped a bit with the blade and gouged the wall.

taking down curtains hung up with 3M command strips

Womp womp.

Obligatory safety police post: BE CAREFUL WHEN YOU’RE USING A BOX CUTTER, KIDS… That is, if you like your wall.  And your fingers.  And toes.  And floors.  Etc.

The removal was even faster on the mirrored wall because the surface is much more durable, thusly making it easier to pull the command strips with vigor, without worrying about pulling off any paint.  I forgot to get an after picture for you guys but its basically this without a bracket on a mirror.  Anti-climactic but true.

taking down curtains hung up with 3M command strips

The strips didn’t even leave any residue on the mirror.  And they held up my curtains forever. Wins all around.  Except for whomever bought this condo.  Sorry ’bout your new-old blinds, friend.

taking down curtains hung up with 3M command strips

Guys, I’m almost 100% packed up and ready to bust out of this natural-light-lacking little condo.  My next post will probably come to you from the new jhbhq.  In the interim…

Have you hung curtains without drilling holes in your wall?  What was your method?  How did the removal go?  Do tell…